The most usual way to start gdb is with one argument, specifying an executable program: gdb program You can also start with both an executable program and a core file specified: gdb program core You can, instead, specify a process ID as a second argument, if you want to debug a running process: gdb program 1234 would attach gdb to process 1234. You can optionally have gdb pass any arguments after the executable file to the inferior using —args. This option stops option processing. gdb —args gcc -O2 -c foo.c
To exit gdb, use the quit command (abbreviated q), or type an end-of-file character (usually Ctrl-d). If you do not supply expression, gdb will terminate normally; otherwise it will terminate using the result of expression as the error code.
An interrupt (often Ctrl-c) does not exit from gdb, but rather terminates the action of any gdb command that is in progress and returns to gdb command level. It is safe to type the interrupt character at any time because gdb does not allow it to take effect until a time when it is safe.
If you need to execute occasional shell commands during your debugging session, there is no need to leave or suspend gdb; you can just use the shell command. shell command-string Invoke a standard shell to execute command-string. The utility make is often needed in development environments. You do not have to use the shell command for this purpose in gdb: make make-args Execute the make program with the specified arguments. This is equivalent to ‘shell make make-args’.
Command Completion you might want to set a breakpoint on a subroutine whose name begins with ‘make’, but when you type b make_TAB gdb just sounds the bell. Typing TAB again displays all the function names in your program that begin with those characters, for example: (gdb) b make TAB gdb sounds bell; press TAB again, to see: make_a_section_from_file make_environ make_abs_section make_function_type
gcc, the gnu C/C++ compiler, supports ‘-g’ with or without ‘-O’, making it possible to debug optimized code. We recommend that you always use ‘-g’ whenever you compile a program. You may think your program is correct, but there is no sense in pushing your luck.
Use the run command to start your program under gdb. The arguments to your program can be specified by the arguments of the run command. The ‘start’ command does the equivalent of setting a temporary breakpoint at the beginning of the main procedure and then invoking the ‘run’ command.
attach process-id This command attaches to a running process—one that was started outside gdb.The first thing gdb does after arranging to debug the specified process is to stop it.
When you have finished debugging the attached process, you can use the detach command to release it from gdb control. Detaching the process continues its execution.
On certain operating systems, gdb is able to save a snapshot of a program’s state, called a checkpoint, and come back to it later.
Thus, if you’re stepping thru a program and you think you’re getting close to the point where things go wrong, you can save a checkpoint. Then, if you accidentally go too far and miss the critical statement, instead of having to restart your program from the beginning, you can just go back to the checkpoint and start again from there. This can be especially useful if it takes a lot of time or steps to reach the point where you think the bug occurs. checkpoint Save a snapshot of the debugged program’s current execution state. The checkpoint command takes no arguments, but each checkpoint is assigned a small integer id, similar to a breakpoint id. info checkpoints restart checkpoint-id delete checkpoint checkpoint-id
The line TimeKeeper time_keeper(Timer()); is ambiguous, since it could be interpreted either as
a variable definition for variable time_keeper of class TimeKeeper, initialized with an anonymous instance of class Timer or
a function declaration for a function time_keeper which returns an object of type TimeKeeper and has a single (unnamed) parameter which is a function returning type Timer (and taking no input).
Most programmers expect the first, but the C++ standard requires it to be interpreted as the second. One way to force the compiler to consider this as a variable definition is to add an extra pair of parentheses:TimeKeeper time_keeper( (Timer()) );
Using the new uniform initialization syntax introduced in C++11 solves this issue (and many more headaches related to initialization styles in C++). The problematic code is then unambiguous when braces are used:
The common use of condition vars is something like:
thread 1:
    pthread_mutex_lock(&mutex);
    while (!condition)
        pthread_cond_wait(&cond, &mutex);
    /* do something that requires holding the mutex and condition is true */
    pthread_mutex_unlock(&mutex);

thread2:
    pthread_mutex_lock(&mutex);
    /* do something that might make condition true */
    pthread_cond_signal(&cond);
    pthread_mutex_unlock(&mutex);
pthread_cond_signal does not unlock the mutex (it can’t as it has no reference to the mutex, so how could it know what to unlock?) In fact, the signal need not have any connection to the mutex; the signalling thread does not need to hold the mutex, though for most algorithms based on condition variables it will.
A spin lock is like a mutex, except that instead of blocking a process by sleeping, the process is blocked by busy-waiting (spinning) until the lock can be acquired.
A pointer to member embodies the type of the class as well as the type of the member. Pointers to member apply only to non static members of a class. static class members are not part of any object, so no special syntax is needed to point to a static member. Pointers to static members are ordinary pointers.
class Screen { public: typedefstd::string::size_type index; charget()const; charget(index ht, index wd)const; private: std::string contents; index cursor; index height, width; }; ## 2. Defining a Pointer to Data Member string Screen::*ps_Screen = &Screen::contents;
typedef char (Screen::*Action)(Screen::index, Screen::index) const; Action get = &Screen::get;
4. Using a Pointer to Member Function
char (Screen::*pmf)() const = &Screen::get;
Screen myScreen;
char c1 = myScreen.get(); // call get on myScreen
char c2 = (myScreen.*pmf)(); // equivalent call to get
Screen *pScreen = &myScreen;
c1 = pScreen->get(); // call get on object to which pScreen points
c2 = (pScreen->*pmf)(); // equivalent call to get
5. Using a Pointer to Data Member
Screen::indexScreen::*pindex = &Screen::width; Screen myScreen; // equivalent ways to fetch width member of myScreen Screen::index ind1 = myScreen.width; // directly Screen::index ind2 = myScreen.*pindex; // dereference to get width Screen *pScreen; // equivalent ways to fetch width member of *pScreen ind1 = pScreen->width; // directly ind2 = pScreen->*pindex; // dereference pindex to get width
6. Pointer-to-Member Function Tables
One common use for function pointers and for pointers to member functions is to store them in a function table. A function table is a collection of function pointers from which a given call is selected at run time.
class Screen { public: // other interface and implementation members as before Screen& home(); // cursor movement functions Screen& forward(); Screen& back(); Screen& up(); Screen& down(); };
class Screen { public: // other interface and implementation members as before // Action is pointer that can be assigned any of the cursor movement members typedef Screen& (Screen::*Action)(); static Action Menu[]; // function table public: // specify which direction to move enum Directions { HOME, FORWARD, BACK, UP, DOWN }; Screen& move(Directions); };
Screen& Screen::move(Directions cm) { // fetch the element in Menu indexed by cm // run that member on behalf of this object (this->*Menu[cm])(); return *this; }
// What's left is to define and initialize the table itself: Screen::Action Screen::Menu[] = { &Screen::home, &Screen::forward, &Screen::back, &Screen::up, &Screen::down, };
The typeid operator, which returns the actual type of the object referred to by a pointer or a reference
The dynamic_cast operator, which safely converts from a pointer or reference to a base type to a pointer or reference to a derived type
These operators return dynamic type information only for classes with one or more virtual functions. For all other types, information for the static (i.e., compile-time) type is returned. Dynamic casts should be used with caution. Whenever possible, it is much better to define and use a virtual function rather than to take over managing the types directly.
2. The dynamic_cast Operator
The dynamic_cast operator can be used to convert a reference or pointer to an object of base type to a reference or pointer to another type in the same hierarchy.
Unlike other casts, a dynamic_cast involves a run-time type check. If the object bound to the reference or pointer is not an object of the target type, then the dynamic_cast fails. If an dynamic_cast to a pointer type fails, the result of the dynamic_cast is the value 0. If a dynamic_cast to a reference type fails, then an exception of type bad_cast is thrown. The verification that the dynamic_cast operator performs must be done at run time.
if (Derived *derivedPtr = dynamic_cast<Derived*>(basePtr))
{
    // use the Derived object to which derivedPtr points
} else { // BasePtr points at a Base object
    // use the Base object to which basePtr points
}
Performing a dynamic_cast in a condition ensures that the cast and test of its result are done in a single expression. Another advantage is that the pointer is not accessible outside the if. If the cast fails, then the unbound pointer is not available for use in later cases where the test might be forgotten.
voidf(const Base &b) { try { const Derived &d = dynamic_cast<const Derived&>(b); // use the Derived object to which b referred } catch (bad_cast) { // handle the fact that the cast failed } }
3. The typeid Operator
typeid(e) where e is any expression or a type name. When the operand is not of class type or is a class without virtual functions, then the typeid operator indicates the static type of the operand. When the operand has a class-type that defines at least one virtual function, then the type is evaluated at run time. The result of a typeid operation is a reference to an object of a library type named type_info.
Base *bp; Derived *dp; // compare type at run time of two objects if(typeid(*bp) == typeid(*dp)) { // bp and dp point to objects of the same type } // test whether run time type is a specific type if(typeid(*bp) == typeid(Derived)) { // bp actually points to a Derived }
Note that the operands to the typeid are expressions that are objectswe tested *bp , not bp. Dynamic type information is returned only if the operand to typeid is an object of a class type with virtual functions. Testing a pointer (as opposed to the object to which the pointer points) returns the static, compile-time type of the pointer.
If the value of a pointer p is 0, then typeid(p) throws a bad_typeid exception if the type of p is a type with virtual functions. If the type of p does not define any virtuals, then the value of p is irrelevant. As when evaluating a sizeof expression the compiler does not evaluate p . It uses the static type of p , which does not require that p itself be a valid pointer.
One common strategy is to preallocate a block of raw memory to hold unconstructed objects. When new elements are created, they could be constructed in one of these preallocated objects. When elements are freed, we’d put them back in the block of preallocated objects rather than actually returning memory to the system. This kind of strategy is often known as maintaining a freelist . The freelist might be implemented as a linked list of objects that have been allocated but not constructed. We’ll define a new class that we’ll name CachedObj to handle the freelist.
The CachedObj class will have a simple interface: Its only job is to allocate and manage a freelist of allocated but unconstructed objects. This class will define a member operator new that will return the next element from the freelist, removing it from the freelist. The operator new will allocate new raw memory whenever the freelist becomes empty. The class will also define operator delete to put an element back on the freelist when an object is destroyed. Classes that wish to use a freelist allocation strategy for their own types will inherit from CachedObj.
As we’ll see, CachedObj may be used only for types that are not involved in an inheritance hierarchy. Unlike the member new and delete operations, CachedObj has no way to allocate different sized objects depending on the actual type of the object: Its freelist holds objects of a single size. Hence, it may be used only for classes, such as QueueItem , that do not serve as base classes. The data members defined by the CachedObj class, and inherited by its derived classes, are:
A static pointer to the head of the freelist
A member named next that points from one CachedObj to the next
The next pointer chains the elements together onto the freelist. Each type that we derive from CachedObj will contain its own type-specific data plus a single pointer inherited from the CachedObj base class. When the object is in use, this pointer is meaningless and not used. When the object is available for use and is on the freelist, then the next pointer is used to point to the next available object.
The only remaining question is what types to use for the pointers in CachedObj. We’d like to use the freelist approach for any type, so the class will be a template. The pointers will point to an object of the template type:
private: staticvoidadd_to_freelist(T*); static allocator<T> alloc_mem; static T *freeStore; staticconstsize_t chunk; T *next; };
The static members manage the freelist. These members are declared as static because there is only one freelist maintained for all the objects of a given type. The freeStore pointer points to the head of the freelist. The member named chunk specifies the number of objects that will be allocated each time the freelist is empty.
template <class T> void * CachedObj<T>::operatornew(size_t sz) { // new should only be asked to build a T, not an object // derived from T; check that right size is requested
The only tricky part is the use of the next member. Recall that CachedObj is intended to be used as a base class. The objects that are allocated aren’t of type CachedObj . Instead, those objects are of a type derived from CachedObj . The type of T , therefore, will be the derived type. The pointer p is a pointer to T , not a pointer to CachedObj . If the derived class has its own member named next , then writing p->next would fetch the next member of the derived class! But we want to set the next in the base, CachedObj class.
What remains is to define the static data members:
template <class T> allocator< T > CachedObj< T >::alloc_mem;
template <class T> T *CachedObj< T >::freeStore = 0;
template <class T> const size_t CachedObj< T >::chunk = 24;
Here is how we use CachedObj:
class Screen: public CachedObj<Screen> { // interfaceand implementation members of class Screen are unchanged }; template <class Type> class QueueItem: public CachedObj< QueueItem<Type> > { // remainder of class declaration and all member definitions unchanged };
2. 练习题
class iStack { public: iStack(int capacity): stack(capacity), top(0) { } private: int top; vector<int> stack; };
(a) iStack *ps = new iStack(20); // ok (b) iStack *ps2 = newconstiStack(15); // error (c) iStack *ps3 = new iStack[ 100 ]; // error
We have learned how to use the allocate class. Now we are using the more primitive library facilities. string * sp = new string("initialized"); Three steps actually take place. First, the expression calls a library function named operator new to allocate raw, untyped memory large enough to hold an object of the specified type. Next, a constructor for the type is run to construct the object from the specified initializers. Finally, a pointer to the newly allocated and constructed object is returned. When we use a delete expression to delete a dynamically allocated object: delete sp; Two steps happen. First, the appropriate destructor is run on the object to which sp points. Then, the memory used by the object is freed by calling a library function named operator delete.
The library functions operator new and operator delete are misleadingly named. Unlike other operator functions, such as operator= , these functions do not overload the new or delete expressions. In fact, we cannot redefine the behavior of the new and delete expressions. A new expression executes by calling an operator new function to obtain memory and then constructs an object in that memory. A delete expression executes by destroying an object and then calls an operator delete function to free the memory used by the object.
There are two overloaded versions of operator new and operator delete functions. Each version supports the related new and delete expression:
void *operatornew(size_t); // allocate an object void *operatornew[](size_t); // allocate an array void *operatordelete(void*); // free an object void *operatordelete[](void*); // free an array
T* newelements = alloc.allocate(newcapacity); // which could be rewritten as T* newelements = static_cast<T*>(operatornew[](newcapacity * sizeof(T)));
alloc.deallocate(elements, end - elements); // which could be rewritten as operatordelete[](elements);
In general, it is more type-safe to use an allocator rather than using the operator new and operator delete functions directly.
2. Placement new Expressions
The library functions operator new and operator delete are lower-level versions of the allocator members allocate and deallocate. Each allocates but does not initialize memory. There are also lower-level alternatives to the allocator members construct and destroy. These members initialize and destroy objects in space allocated by an allocator object. Placement new allows us to construct an object at a specific, preallocated memory address. The form of a placement new expression is:
new (place_address) type new (place_address) type(initializer-list)
alloc.construct(first_free, t); // would be replaced by the equivalent placement new expression // copy t into element addressed by first_free new (first_free) T(t);
Placement new expressions are more flexible than the construct member of class allocator. When placement new initializes an object, it can use any constructor, and builds the object directly. The construct function always uses the copy constructor.
allocator<string> alloc; string *sp = alloc.allocate(2); // allocate space to hold 2 strings // two ways to construct astring from a pair of iterators new (sp) string(b, e); // construct directly in place alloc.construct(sp + 1, string(b, e)); // build andcopya temporary
The placement new expression uses the string constructor that takes a pair of iterators to construct the string directly in the space to which sp points. When we call construct, we must first construct the string from the iterators to get a string object to pass to construct. That function then uses the string copy constructor to copy that unnamed, temporary string into the object to which sp points.
3. Explicit Destructor Invocation
for(T *p = first_free; p != elements; /* empty */ ) alloc.destroy(--p); for(T *p = first_free; p != elements; /* empty */ ) p->~T(); // call the destructor
The effect of calling the destructor explicitly is that the object itself is properly cleaned up. However, the memory in which the object resided is not freed. We can reuse the space if desired.
4. Class Specific new and delete
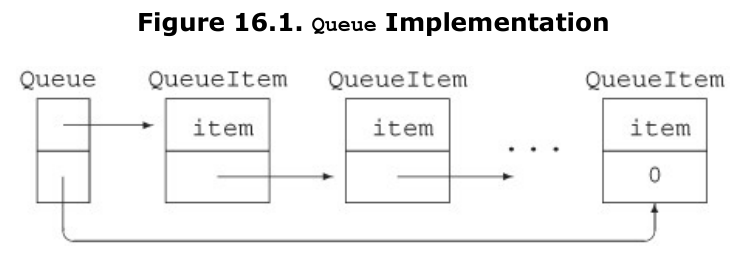
Another way to optimize memory allocation involves optimizing the behavior of new expressions. As an example, consider the Queue class from Chapter 16. That class doesn’t hold its elements directly. Instead, it uses new expressions to allocate objects of type QueueItem.
It might be possible to improve the performance of Queue by preallocating a block of raw memory to hold QueueItem objects. When a new QueueItem object is created, it could be constructed in this preallocated space. When QueueItem objects are freed, we’d put them back in the block of preallocated objects rather than actually returning memory to the system.
By default, new expressions allocate memory by calling the version of operator new that is defined by the library. A class may manage the memory used for objects of its type by defining its own members named operator new and operator delete.
When the compiler sees a new or delete expression for a class type, it looks to see if the class has a member operator new or operator delete . If the class defines (or inherits) its own member new and delete functions, then those functions are used to allocate and free the memory for the object. Otherwise, the standard library versions of these functions are called.
When we optimize the behavior of new and delete , we need only define new versions of the operator new and operator delete . The new and delete expressions themselves take care of constructing and destroying the objects. If a class defines either of these members, it should define both of them.
A class member operator new function must have a return type of void* and take a parameter of type size_t . The function’s size_t parameter is initialized by the new expression with the size, in bytes, of the amount of memory to allocate. A class member operator delete function must have a void return type. It can be defined to take a single parameter of type void or to take two parameters, a void and a size_t . The void* parameter is initialized by the delete expression with the pointer that was delete d. That pointer might be a null pointer. If present, the size_t parameter is initialized automatically by the compiler with the size in bytes of the object addressed by the first parameter.
The size_t parameter is unnecessary unless the class is part of an inheritance hierarchy. When we delete a pointer to a type in an inheritance hierarchy, the pointer might point to a base-class object or an object of a derived class. In general, the size of a derived-type object is larger than the size of a base-class object. If the base class has a virtual destructor, then the size passed to operator delete will vary depending on the dynamic type of the object to which the deleted pointer points. If the base class does not have a virtual destructor, then, as usual, the behavior of deleting a pointer to a derived object through a base-class pointer is undefined.
These functions are implicitly static members. There is no need to declare them static explicitly, although it is legal to do so. The member new and delete functions must be static because they are used either before the object is constructed ( operator new ) or after it has been destroyed ( operator delete ). There are, therefore, no member data for these functions to manipulate. As with any other static member function, new and delete may access only static members of their class directly.
We can also define member operator new[] and operator delete[] to manage arrays of the class type. If these operator functions exist, the compiler uses them in place of the global versions.
A class member operator new[] must have a return type of void* and take a first parameter of type size_t . The operator’s size_t parameter is initialized automatically with a value that represents the number of bytes required to store an array of the given number of elements of the specified type.
The member operator delete[] must have a void return type and a first parameter of type void . The operator’s void parameter is initialized automatically with a value that represents the beginning of the storage in which the array is stored.
The operator delete[] for a class may also have two parameters instead of one, the second parameter being a size_t . If present, the additional parameter is initialized automatically by the compiler with the size in bytes of the storage required to store the array.
A user of a class that defines its own member new and delete can force a new or delete expression to use the global library functions through the use of the global scope resolution operator. If the user writes
Type *p = ::new Type; // uses global operator new
::delete p; // uses global operator delete
If storage was allocated with a new expression invoking the global operator new function, then the delete expression should also invoke the global operator delete function.
A common strategy is to preallocate memory to be used when new objects are created, constructing each new object in preallocated memory as needed. We need to decouple memory allocation from object construction. The obvious reason to decouple allocation and construction is that constructing objects in preallocated memory is wasteful.
In C++, When we use a new expression, memory is allocated, and an object is constructed in that memory. When we use a delete expression, a destructor is called to destroy the object and the memory used by the object is returned to the system. When we take over memory allocation, we must deal with both these tasks. When we allocate raw memory, we must construct object(s) in that memory. Before freeing that memory, we must ensure that the objects are properly destroyed. C++ provides two ways to allocate and free unconstructed, raw memory:
The allocator class, which provides type-aware memory allocation. This class supports an abstract interface to allocating memory and subsequently using that memory to hold objects.
The library operator new and operator delete functions, which allocate and free raw, untyped memory of a requested size.
C++ also provides various ways to construct and destroy objects in raw memory:
The allocator class defines members named construct and destroy. The construct member initializes objects in unconstructed memory; the destroy member runs the appropriate destructor on objects.
The placement new expression takes a pointer to unconstructed memory and initializes an object or an array in that space.
We can directly call an object’s destructor to destroy the object. Running the destructor does not free the memory in which the object resides.
The algorithms uninitialized_fill and uninitialized_copy execute like the fill and copy algorithms except that they construct objects in their destination rather than assigning to them.
// The behavior of copy templateis equivalent to: template<class InputIterator, class OutputIterator> OutputIterator copy (InputIterator first, InputIterator last, OutputIteratorresult) { while (first!=last) { *result = *first; ++result; ++first; } returnresult; }
也就是说copy是赋值行为,uninitialized_copy是在一块raw内存中的初始化行为。赋值行为意味着将释放原来的数据。Assigning to an object in unconstructed memory rather than initializing it is undefined. For many classes, doing so causes a crash at run time. Assignment involves freeing the existing object. If there is no existing object, then the actions in theassignment operator can have disastrous effects.
Modern C++ programs ordinarily ought to use the allocator class to allocate memory. It is safer and more flexible. However, when constructing objects, the placement new expression is more flexible than the allocator::construct member. There are some cases where placement new must be used. 因为allocator::construct只能使用拷贝构造函数来构造对象。
2. The allocator Class
Class allocator
allocator a;
Defines an allocator object named a that can allocate memory or construct objects of type T.
a.allocate(n)
Allocates raw, unconstructed memory to hold n objects of type T.
a.deallocate(p, n)
Deallocates memory that held n objects of type T starting at address contained in the T* pointer named p. It is the user’s responsibility to run destroy on any objects that were constructed in this memory before calling deallocate.
a.construct(p, t)
Constructs a new element in the memory pointed to by the T* pointer p. The copy constructor of type T is run to initialize the object from t.
a.destroy(p)
Runs the destructor on the object pointed to by the T* pointer p.
uninitialized_copy(b, e, b2)
Copies elements from the input range denoted by iterators b and e into unconstructed, raw memory beginning at iterator b2. The function constructs elements in the destination, rather than assigning them. The destination denoted by b2 is assumed large enough to hold a copy of the elements in the input range.
uninitialized_fill(b, e, t)
Initializes objects in the range denoted by iterators b and e as a copy of t. The range is assumed to be unconstructed, raw memory. The objects are constructed using the copy constructor.
uninitialized_fill_n(b, e, t, n)
Initializes at most an integral number n objects in the range denoted by iterators b and e as a copy of t. The range is assumed to be at least n elements in size. The objects are constructed using the copy constructor.
The allocator class separates allocation and object construction. When an allocator object allocates memory, it allocates space that is appropriately sized and aligned to hold objects of the given type. However, the memory it allocates is unconstructed. Users of allocator must separately construct and destroy objects placed in the memory it allocates.
3. Using allocator to Manage Class Member Data
To understand how we might use a preallocation strategy and the allocator class to manage the internal data needs of a class, let’s think a bit more about how memory allocation in the vector class might work.
// pseudo-implementation of memory allocation strategy for a vector-like class template <class T> class Vector { public: Vector(): elements(0), first_free(0), end(0) { } void push_back(const T&); // ... private: static std::allocator<T> alloc; // object to get raw memory void reallocate(); // get more space and copy existing elements T* elements; // pointer to first element in the array T* first_free; // pointer to first free element in the array T* end; // pointer to one past the endof the array // ... };
Each Vector type defines a static data member of type allocator to allocate and construct the elements in Vectors of the given type. deallocate expects a pointer that points to space that was allocated by allocate. It is not legal to pass deallocate a zero pointer.
classBear : public ZooAnimal { }; classPanda : public Bear, public Endangered { };
The constructor initializer controls only the values that are used to initialize the base classes, not the order in which the base classes are constructed. The base-class constructors are invoked in the order in which they appear in the class derivation list. For Panda , the order of base-class initialization is:
ZooAnimal, the ultimate base class up the hierarchy from Panda ‘s immediate base clas Bear.
Bear, the first immediate base class.
Endangered, the second immediate base, which itself has no base class.
Panda, the members of Panda itself are initialized, and then the body of its constructor is run.
Destructors are always invoked in the reverse order from which the constructors are run. In our example, the order in which the destructors are called is ~Panda, ~Endangered, ~Bear, ~ZooAnimal.
classX{ ... }; classA{ ... }; classB : public A { ... }; classC : private B { ... }; classD : public X, public C { ... };
which, if any, of the following conversions are not permitted? D *pd = new D; (a) X *px = pd; (c) B *pb = pd; (b) A *pa = pd; (d) C *pc = pd;
As is the case for single inheritance, if a class with multiple bases defines its own destructor, that destructor is responsible only for cleaning up the derived class. If the derived class defines its own copy constructor or assignment operator, then the class is responsible for copying (assigning) all the base class subparts. The base parts are automatically copied or assigned only if the derived class uses the synthesized versions of these members.
As usual, name lookup for a name used in a member function starts in the function itself. If the name is not found locally, then lookup continues in the member’s class and then searches each base class in turn. Under multiple inheritance, the search simultaneously examines all the base-class inheritance subtreesin our example, both the Endangered and the Bear / ZooAnimal subtrees are examined in parallel. If the name is found in more than one subtree, then the use of that name must explicitly specify which base class to use. Otherwise, the use of the name is ambiguous.
2. Multiple Base Classes Can Lead to Ambiguities
Assume both Bear and Endangered define a member named print . If Panda does not define that member, then a statement such as the following ying_yang.print(cout);results in a compile-time error. Although the ambiguity of the two inherited print members is reasonably obvious, it might be more surprising to learn that an error would be generated even if the two inherited functions had different parameter lists. Similarly, it would be an error even if the print function were private in one class and public or protected in the other. Finally, if print were defined in ZooAnimal and not Bear, the call would still be in error. It’s because name lookup happens first. As always, name lookup happens in two steps: First the compiler finds a matching declaration (or, in this case, two matching declarations, which causes the ambiguity). Only then does the compiler decide whether the declaration it found is legal.
We could resolve the print ambiguity by specifying which class to use:ying_yang.Endangered::print(cout);. The best way to avoid potential ambiguities is to define a version of the function in the derived class that resolves the ambiguity.
3. Virtual Inheritance
classistream : public virtual ios { ... }; classostream : virtual public ios { ... }; classiostream: public istream, public ostream { ... };
Members in the shared virtual base can be accessed unambiguously and directly. Similarly, if a member from the virtual base is redefined along only one derivation path, then that redefined member can be accessed directly. Under a nonvirtual derivation, both kinds of access would be ambiguous. Assume a member named X is inherited through more than one derivation path. There are three possibilities:
If in each path X represents the same virtual base class member, then there is no ambiguity because a single instance of the member is shared.
If in one path X is a member of the virtual base class member and in another path X is a member of a subsequently derived class, there is also no ambiguitythe specialized derived class instance is given precedence over the shared virtual base class instance.
If along each inheritance path X represents a different member of a subsequently derived class, then the direct access of the member is ambiguous.
4. Special Initialization Semantics
To solve the duplicate-initialization problem, classes that inherit from a class that has a virtual base have special handling for initialization. In a virtual derivation, the virtual base is initialized by the most derived constructor. Although the virtual base is initialized by the most derived class, any classes that inherit immediately or indirectly from the virtual base usually also have to provide their own initializers for that base. As long as we can create independent objects of a type derived from a virtual base, that class must initialize its virtual base. These initializers are used only when we create objects of the intermediate type.
The ZooAnimal part is constructed first, using the initializers specified in the Panda constructor initializer list.
Next, the Bear part is constructed. The initializers for ZooAnimal Bear’s constructor initializer list are ignored.
Then the Raccoon part is constructed, again ignoring the ZooAnimal initializers.
Finally, the Panda part is constructed.
If the Panda constructor does not explicitly initialize the ZooAnimal base class, then the ZooAnimal default constructor is used. If ZooAnimal doesn’t have a default constructor, then the code is in error.
5. Constructor and Destructor Order
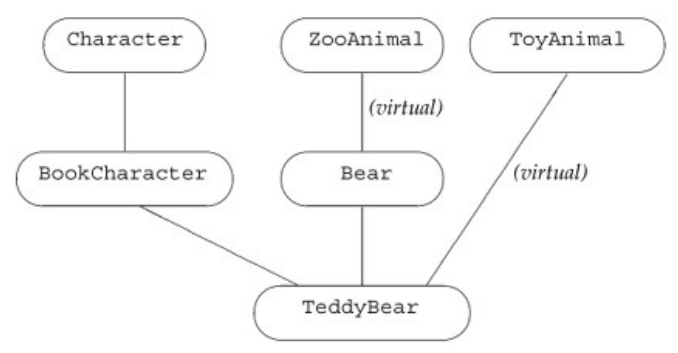
Virtual base classes are always constructed prior to nonvirtual base classes regardless of where they appear in the inheritance hierarchy. The immediate base classes are examined in declaration order to determine whether there are any virtual base classes. In our example, the inheritance subtree of BookCharacter is examined first, then that of Bear , and finally that of ToyAnimal. Each subtree is examined starting at the root class down to the most derived class.
The order in which the virtual base classes are constructed for TeddyBear is ZooAnimal followed by ToyAnimal. Once the virtual base classes are constructed, the nonvirtual base-class constructors are invoked in declaration order: BookCharacter, which causes the Character constructor to be invoked, and then Bear. Thus, to create a TeddyBear, the constructors are invoked in the following order:
ZooAnimal(); //Bear's virtual base class ToyAnimal(); // immediate virtual base class Character(); // BookCharacter's nonvirtual base class BookCharacter(); // immediate nonvirtual base class Bear(); // immediate nonvirtual base class TeddyBear(); // most derived class
where the initializers used for ZooAnimal and ToyAnimal are specified by the most derived class TeddyBear. The same construction order is used in the synthesized copy constructor; the base classes also are assigned in this order in the synthesized assignment operator. The order of base-class destructor calls is guaranteed to be the reverse order of constructor invocation.
6. example1
classClass{ ... }; classBase : public Class { ... }; classDerived1 : virtual public Base { ... }; classDerived2 : virtual public Base { ... }; classMI : public Derived1, public Derived2 { ... }; classFinal : public MI, public Class { ... };
What is the order of constructor and destructor for the definition of a Final object?
When a name is used in a class scope, we look first in the member itself, then in the class, including any base classes. Only after exhausting the class(es) do we examine the enclosing scopes.
namespace A { int i; int k; classC1{ public: C1(): i(0), j(0) { } // ok: initializes C1::i and C1::j intf1() { return k; // returns A::k } intf2() { return h; // error: h is not defined } intf3(); private: int i; // hides A::i within C1 int j; }; int h = i; // initialized from A::i } // member f3 is defined outside class C1 and outside namespace A int A::C1::f3() { return h; // ok: returns A::h }
2. Argument-Dependent Lookup and Class Type Parameters
It looks for a matching function in the current scope, the scopes enclosing the call to getline, and in the namespace(s) in which the type of cin and the string type are defined. Hence, it looks in the namespace std and finds the getline function defined by the string type.
3. Implicit Friend Declarations and Namespaces
Recall that when a class declares a friend function, a declaration for the function need not be visible. If there isn’t a declaration already visible, then the friend declaration has the effect of putting a declaration for that function or class into the surrounding scope. If a class is defined inside a namespace, then an otherwise undeclared friend function is declared in the same namespace:
namespace A { class C { friendvoidf(const C&); // makes f a member of namespace A }; }
voidf2() { A::C cobj; f(cobj); // calls A::f }
4. Candidate Functions and Namespaces
Namespaces can have two impacts on function matching. One of these should be obvious: A using declaration or directive can add functions to the candidate set. The other is much more subtle. As we saw in the previous section, name lookup for functions that have one or more class-type parameters includes the namespace in which each parameter’s class is defined. This rule also impacts how we determine the candidate set. Each namespace that defines a class used as a parameter (and those that define its base class(es)) is searched for candidate functions. Any functions in those namespaces that have the same name as the called function are added to the candidate set. These functions are added even though they otherwise are not visible at the point of the call. Functions with the matching name in those namespaces are added to the candidate set:
namespaceNS { classItem_base { /* ... */ }; voiddisplay(const Item_base&) { } } // Bulk_item's base class is declared in namespace NS classBulk_item : publicNS::Item_base { }; intmain() { Bulk_item book1; display(book1); return0; }
5. Overloading and using Declarations
There is no way to write a using declaration to refer to a specific function declaration:
using NS::print(int); // error: cannot specify parameter list
using NS::print; // ok: using declarations specify names only
If a function is overloaded within a namespace, then a using declaration for the name of that function declares all the functions with that name. If there are print functions for int and double in the namespace NS, then a using declaration for NS::print makes both functions visible in the current scope.
If the using declaration introduces a function in a scope that already has a function of the same name with the same parameter list, then the using declaration is in error. Otherwise, the using declaration defines additional overloaded instances of the given name. The effect is to increase the set of candidate functions.
6. Namespaces and Templates
Declaring a template within a namespace impacts how template specializations are declared: An explicit specialization of a template must be declared in the namespace in which the generic template is defined. Otherwise, the specialization would have a different name than the template it specialized.
There are two ways to define a specialization: One is to reopen the namespace and add the definition of the specialization, which we can do because namespace definitions are discontiguous. Alternatively, we could define the specialization in the same way that we can define any namespace member outside its namespace definition: by defining the specialization using the template name qualified by the name of the namespace.
To provide our own specializations of templates defined in a namespace, we must ensure that the specialization definition is defined as being in the namespace containing the original template definition.
Unlike other scopes, a namespace can be defined in several parts. A namespace is made up of the sum of its separately defined parts; a namespace is cumulative. The separate parts of a namespace can be spread over multiple files. The fact that namespace definitions can be discontiguous means that we can compose a namespace from separate interface and implementation files. Thus, a namespace can be organized in the same way that we manage our own class and function definitions:
Namespace members that define classes and declarations for the functions and objects that are part of the class interface can be put into header files. These headers can be included by files that use namespace members.
The definitions of namepsace members can be put in separate source files.
Namespaces that define multiple, unrelated types should use separate files to represent each type that the namespace defines.
// ---- Sales_item.cc ---- #include "Sales_item.h" namespacecplusplus_primer { // definitions for Sales_item members and overloaded operators }
It is also possible to define a namespace member outside its namespace definition. This definition should look similar to class member functions defined outside a class. The return type and function name are qualified by the namespace name. Once the fully qualified function name is seen, we are in the scope of the namespace. Thus, references to namespace members in the parameter list and the function body can use unqualified names to reference Sales_item.
Although a namespace member can be defined outside its namespace definition, there are restrictions on where this definition can appear. Only namespaces enclosing the member declaration can contain its definition. For example, operator+ could be defined in either the cplusplus_primer namespace or at global scope. It may not be defined in an unrelated namespace.
2. Unnamed Namespaces
Unnamed namespaces are not like other namespaces; the definition of an unnamed namespace is local to a particular file and never spans multiple text files. An unnamed namespace may be discontiguous within a given file but does not span files. Each file has its own unnamed namespace. Names defined in an unnamed namespace are used directly; after all, there is no namespace name with which to qualify them. It is not possible to use the scope operator to refer to members of unnamed namespaces.
Names defined in an unnamed namespace are found in the same scope as the scope at which the namespace is defined. If an unnamed namespace is defined at the outermost scope in the file, then names in the unnamed namespace must differ from names defined at global scope:
int i; // global declaration for i
namespace {
    int i;
}
// error: ambiguous defined globally and in an unnested, unnamed namespace
i = 10;
The use of file static declarations is deprecated by the C++ standard. File statics should be avoided and unnamed namespaces used instead.
3. Using Namespace Members
Referring to namespace members as namespace_name::member_name is admittedly cumbersome, especially if the namespace name is long. Fortunately, there are ways to make it easier to use namespace members: using declarations、namespace aliases and using directives.
Header files should not contain using directives or using declarations except inside functions or other scopes. A header that includes a using directive or declaration at its top level scope has the effect of injecting that name into the file that includes the header. Headers should define only the names that are part of its interface, not names used in its own implementation.
A namespace alias can be used to associate a shorter synonym with a namespace name. For example
cplusplus_primer::QueryLib::Query tq; // we could define anduse an aliasforcplusplus_primer::QueryLib namespace Qlib = cplusplus_primer::QueryLib; Qlib::Query tq;
It can be tempting to write programs with using directives, but doing so reintroduces all the problems inherent in name collisions when using multiple libraries.
The scope of names introduced by a using directive is more complicated than those for using declarations. A using declaration puts the name directly in the same scope in which the using declaration itself appears. It is as if the using declaration is a local alias for the namespace member.
A using directive does not declare local aliases for the namespace member names. Rather, it has the effect of lifting the namespace
members into the nearest scope that contains both the namespace itself and the using directive. One place where using directives are useful is in the implementation files for the namespace itself.
namespaceblip { int bi = 16, bj = 15, bk = 23; } intbj = 0; // ok: bj inside blip is hidden inside a namespace void manip() { // using directive - names in blip "added" to global scope using namespace blip; // clash between ::bj and blip::bj // detected only ifbj is used ++bi; // setsblip::bi to 17 ++bj; // error: ambiguous // globalbj or blip::bj? ++::bj; // ok: setsglobalbj to 1 ++blip::bj; // ok: setsblip::bj to 16 int bk = 97; // local bk hides blip::bk ++bk; // sets local bk to 98 }
It is possible for names in the namespace to conflict with other names defined in the enclosing scope. For example, the blip member bj appears to manip as if it were declared at global scope. However, there is another object named bj in global scope. Such conflicts are permitted; but to use the name, we must explicitly indicate which version is wanted. Therefore, the use of bj within manip is ambiguous: The name refers both to the global variable and to the member of namespace blip.
4. Example
namespace Exercise { int ivar = 0; double dvar = 0; constint limit = 1000; } int ivar = 0; // position 1 voidmanip(){ // position 2 double dvar = 3.1416; int iobj = limit + 1; ++ivar; ++::ivar; }
What are the effects of the declarations and expressions in this code sample if using declarations for all the members of namespace Exercise are located at the location labeled position 1? At position 2 instead? Now answer the same question but replace the using declarations with a using directive for namespace Exercise. 解答:如果Exercise的所有成员使用using声明放在position 1,则 using Exercise::ivar导致重复定义的错误。manip中的dvar会屏蔽Exercise::dvar。如果Exercise的所有成员使用using声明放在position 2,manip中的dvar会出现重复定义的错误。++ivar访问到的是Exercise::ivar,++::ivar访问的是全部变量ivar。如果Exercise的所有成员使用using指示放在position 1,则 ++ivar;会导致二义性错误。如果Exercise的所有成员使用using指示放在position 2, ++ivar;依然会导致二义性错误。
5. Caution: Avoid Using Directives
using directives, which inject all the names from a namespace, are deceptively simple to use: With only a single statement, all the member names of a namespace are suddenly visible. Although this approach may seem simple, it can introduce its own problems. If an application uses many libraries, and if the names within these libraries are made visible with using directives, then we are back to square one, and the global namespace pollution problem reappears.
Moreover, it is possible that a working program will fail to compile when a new version of the library is introduced. This problem can arise if a new version introduces a name that conflicts with a name that the application is using.
Another problem is that ambiguity errors caused by using directives are detected only at the point of use. This late detection means that conflicts can arise long after introducing a particular library. If the program begins using a new part of the library, previously undetected collisions may arise.
Rather than relying on a using directive, it is better to use a using declaration for each namespace name used in the program. Doing so reduces the number of names injected into the namespace. Ambiguity errors caused by using declarations are detected at the point of declaration, not use, and so are easier to find and fix.
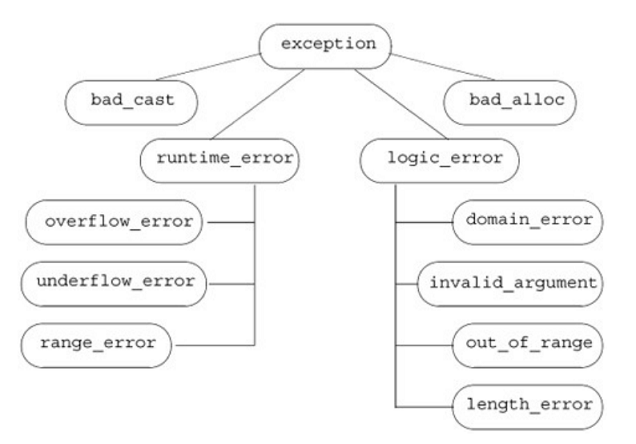
An exception specification specifies that if the function throws an exception, the exception it throws will be one of the exceptions included in the specification, or it will be a type derived from one of the listed exceptions. An exception specification follows the function parameter list. An exception specification is the keyword throw followed by a (possibly empty) list of exception types enclosed in parentheses: void recoup(int) throw(runtime_error); An empty specification list says that the function does not throw any exception:void no_problem() throw(); An exception specification is part of the function’s interface. The function definition and any declarations of the function must have the same specification. If a function declaration does not specify an exception specification, the function can throw exceptions of any type.
Unfortunately, it is not possible to know at compile time whether or which exceptions a program will throw. Violations of a function’s exception specification can be detected only at run time. If a function throws an exception not listed in its specification, the library function unexpected is invoked. By default, unexpected calls terminate , which ordinarily aborts the program.
Specifying that a function will not throw any exceptions can be helpful both to users of the function and to the compiler: Knowing that a function will not throw simplifies the task of writing exception-safe code that calls that function. We can know that we need not worry about exceptions when calling it. Moreover, if the compiler knows that no exceptions will be thrown, it can perform optimizations that are suppressed for code that might throw.
The isbn_mismatch class inherits from logic_error , which is one of the standard exception classes. The destructors for the standard exception classes include an empty throw() specifier; they promise that they will not throw any exceptions. When we inherit from one of these classes, then our destructor must also promise not to throw any exceptions.
Our out_of_stock class had no members, and so its synthesized destructor does nothing that might throw an exception. Hence, the compiler can know that the synthesized destructor will abide by the promise not to throw.
The isbn_mismatch class has two members of class string, which means that the synthesized destructor for isbn_mismatch calls the string destructor. The C++ standard stipulates that string destructor, like any other library class destructor, will not throw an exception. However, the library destructors do not define exception specifications. In this case, we know, but the compiler doesn’t, that the string destructor won’t throw. We must define our own destructor to reinstate the promise that the destructor will not throw.
4. Exception Specifications and Virtual Functions
A virtual function in a base class may have an exception specification that differs from the exception specification of the corresponding virtual in a derived class. However, the exception specification of a derived-class virtual function must be either equally or more restrictive than the exception specification of the corresponding base-class virtual function.
class Base { public: virtualdoublef1(double)throw(); virtualintf2(int)throw(std::logic_error); virtualstd::stringf3()throw(std::logic_error, std::runtime_error); }; class Derived : public Base { public: // error: exception specification is less restrictive than Base::f1's doublef1(double)throw(std::underflow_error); // ok: same exception specification as Base::f2 intf2(int)throw(std::logic_error); // ok: Derived f3 is more restrictive std::stringf3()throw(); }
By restricting which exceptions the derived classes will throw to those listed by the base class, we can write our code knowing what exceptions we must handle.
5. Function Pointer Exception Specifications
An exception specification is part of a function type. As such, exception specifications can be provided in the definition of a pointer to function:void (*pf)(int) throw(runtime_error); When a pointer to function with an exception specification is initialized from (or assigned to) another pointer (or to the address of a function), the exception specifications of both pointers do not have to be identical. However, the specification of the source pointer must be at least as restrictive as the specification of the destination pointer.
void recoup(int) throw(runtime_error);
// ok: recoup is as restrictive as pf1
void (*pf1)(int) throw(runtime_error) = recoup;
// ok: recoup is more restrictive than pf2
void (*pf2)(int) throw(runtime_error, logic_error) = recoup;
// error: recoup is less restrictive than pf3
void (*pf3)(int) throw() = recoup;
// ok: recoup is more restrictive than pf4
void (*pf4)(int) = recoup;
We know that local objects are automatically destroyed when an exception occurs. The fact that destructors are run has important implication for the design of applications.
voidf() { vector<string> v; // local vector string s; while (cin >> s) v.push_back(s); // populate the vector string *p = newstring[v.size()]; // dynamic array // remaining processing // it is possible that an exception occurs in this code // function cleanup is bypassed if an exception occurs delete [] p; } // v destroyed automatically when the function exits
If an exception occurs inside the function, then the vector will be destroyed but the array will not be freed. The problem is that the array is not freed automatically. No matter when an exception occurs, we are guaranteed that the vector destructor is run.
4. Using Classes to Manage Resource Allocation
The fact that destructors are run leads to an important programming technique that makes programs more exception safe . By exception safe, we mean that the programs operate correctly even if an exception occurs. In this case, the “safety” comes from ensuring that any resouce that is allocated is properly freed if an exception occurs. We can guarantee that resources are properly freed by defining a class to encapsulate the acquisition and release of a resource.
5. The auto_ptr Class
The standard-library auto_ptr class is an example of the exception-safe “resource allocation is initialization” technique. The aut_ptr class is a template that takes a single type parameter. It provides exception safety for dynamically allocated objects. The auto_ptr class is defined in the memory header. auto_ptr can be used only to manage single objects returned from new. It does not manage dynamically allocated arrays. As we’ll see, auto_ptr has unusual behavior when copied or assigned. As a result, auto_ptrs may not be stored in the library container types.
voidf() { int *ip = newint(42); // dynamically allocate a new object // code that throws an exception that is not caught inside f delete ip; // return the memory before exiting } voidf() { auto_ptr<int> ap(newint(42)); // allocate a new object // code that throws an exception that is not caught inside f } // auto_ptr freed automatically when function ends
Class auto_ptr
auto_ptr<T> ap
Create an unbound auto_ptr named ap.
auto_ptr<T> ap(p)
Create an auto_ptr named ap that owns the object pointed to by the pointer p. This constructor is explicit.
auto_ptr<T> ap1(ap2)
Create an auto_ptr named ap1 that holds the pointer originally stored in ap2. Transfers ownership to ap1; ap2 becomes an unbound auto_ptr.
ap1 = ap2
Transfers ownership from ap2 to ap1. Deletes the object to which ap1 points and makes ap1 point to the object to which ap2 points, making ap2 unbound.
~ap
Destructor. Deletes the object to which ap points.
*ap
Returns a reference to the object to which ap is bound.
ap->
Returns the pointer that ap holds.
ap.reset(p)
If the pointer p is not the same value as ap holds, then it deletes the object to which ap points and binds ap to p.
ap.release()
Returns the pointer that ap had held and makes ap unbound.
ap.get()
Returns the pointer that ap holds.
To determine whether the auto_ptr object refers to an object, we can compare the return from get with 0. get should be used only to interrogate an auto_ptr or to use the returned pointer value. get should not be used as an argument to create another auto_ptr. Using get member to initialize another auto_ptr violates the class design principle that only one auto_ptr holds a given pointer at any one time. If two auto_ptrs hold the same pointer, then the pointer will be deleted twice.
6. Copy and Assignment on auto_ptr Are Destructive Operations
When we copy an auto_ptr or assign its value to another auto_ptr, ownership of the underlying object is transferred from the original to the copy. The original auto_ptr is reset to an unbound state. Unlike other copy or assignment operations, auto_ptr copy and assignment change the right-hand operand. As a result, both the left- and right-hand operands to assignment must be modifiable lvalues. Because copy and assignment are destructive operations, auto_ptrs cannot be stored in the standard containers. The library container classes require that two objects be equal after a copy or assignment. This requirement is not met by auto_ptr. If we assign ap2 to ap1, then after the assignment ap1 != ap2.
7. Caution: Auto_ptr Pitfalls
The auto_ptr class template provides a measure of safety and convenience for handling dynamically allocated memory. To use auto_ptr correctly, we must adhere to the restrictions that the class imposes:
Do not use an auto_ptr to hold a pointer to a statically allocated object. Otherwise, when the auto_ptr itself is destroyed, it will attempt to delete a pointer to a nondynamically allocated object, resulting in undefined behavior.
Never use two auto_ptrs to refer to the same object. One obvious way to make this mistake is to use the same pointer to initialize or to reset two different auto_ptr objects. A more subtle way to make this mistake would be to use the result from get on one auto_ptr to initialize or reset another.
Do not use an auto_ptr to hold a pointer to a dynamically allocated array. When the auto_ptr is destroyed, it frees only a single objectit uses the plain delete operator, not the array delete [] operator.
Do not store an auto_ptr in a container. Containers require that the types they hold define copy and assignment to behave similarly to how those operations behave on the built-in types: After the copy (or assignment), the two objects must have the same value. auto_ptr does not meet this requirement.
Exception handling relies on the problem-detecting part throwing an object to a handler. The type and contents of that object allow the two parts to communicate about what went wrong.
Sales_item operator+(const Sales_item& lhs, const Sales_item& rhs) { if (!lhs.same_isbn(rhs)) throw runtime_error("Data must refer to same ISBN"); Sales_item ret(lhs); return ret += rhs; return ret; }
An exception is raised by throwing an object. The type of that object determines which handler will be invoked. The selected handler is the one nearest in the call chain that matches the type of the object.
Exceptions are thrown and caught in ways that are similar to how arguments are passed to functions. An exception can be an object of any type that can be passed to a nonreference parameter, meaning that it must be possible to copy objects of that type. Recall that when we pass an argument of array or function type, that argument is automatically converted to an pointer. The same automatic conversion happens for objects that are thrown. As a consequence, there are no exceptions of array or function types. Instead, if we throw an array, the thrown object is converted to a pointer to the first element in the array. Similarly, if we throw a function, the function is converted to a pointer to the function. The fact that control passes from one location to another has two important implications:
Functions along the call chain are prematurely exited. Following section discusses what happens when functions are exited due to an exception.
In general, the storage that is local to a block that throws an exception is not around when the exception is handled.
Because local storage is freed while handling an exception, the object that is thrown is not stored locally. Instead, the throw expression is used to initialize a special object referred to as the exception object . The exception object is managed by the compiler and is guaranteed to reside in space that will be accessible to whatever catch is invoked. This object is created by a throw , and is initialized as a copy of the expression that is thrown. The exception object is passed to the corresponding catch and is destroyed after the exception is completely handled. The exception object is created by copying the result of the thrown expression; that result must be of a type that can be copied. What’s important to know is how the form of the throw expression interacts with types related by inheritance. When an exception is thrown, the static, compile-time type of the thrown object determines the type of the exception object.
The one case where it matters that a throw expression throws the static type is if we dereference a pointer in a throw. The result of dereferencing a pointer is an object whose type matches the type of the pointer. If the pointer points to a type from an inheritance hierarchy, it is possible that the type of the object to which the pointer points is different from the type of the pointer. Regardless of the object’s actual type, the type of the exception object matches the static type of the pointer. If that pointer is a base-class type pointer that points to a derived-type object, then that object is sliced down; only the base-class part is thrown.
In particular, it is always an error to throw a pointer to a local object for the same reasons as it is an error to return a pointer to a local object from a function. It is usually a bad idea to tHRow a pointer: Throwing a pointer requires that the object to which the pointer points exist wherever the corresponding handler resides.
3. Stack Unwinding
When an exception is thrown, execution of the current function is suspended and the search begins for a matching catch clause. The search starts by checking whether the tHRow itself is located inside a try block. If so, the catch clauses associated with that try are examined to see if one of them matches the thrown object. If a matching catch is found, the exception is handled. If no catch is found, the current function is exitedits memory is freed and local objects are destroyed and the search continues in the calling function.
If the call to the function that threw is in a try block, then the catch clauses associated with that try are examined. If a matching catch is found, the exception is handled. If no matching catch is found, the calling function is also exited, and the search continues in the function that called this one.
This process, known as stack unwinding, continues up the chain of nested function calls until a catch clause for the exception is found. As soon as a catch clause that can handle the exception is found, that catch is entered, and execution continues within this handler. When the catch completes, execution continues at the point immediately after the last catch clause associated with that try block.
When a function is exited due to an exception, the compiler guarantees that the local objects are properly destroyed. During stack unwinding, the memory used by local objects is freed and destructors for local objects of class type are run.
Destructors are often executed during stack unwinding. When destructors are executing, the exception has been raised but not yet handled. While stack unwinding is in progress for an exception, a destructor that throws another exception of its own that it does not also handle, causes the library terminate function is called. Ordinarily, terminate calls abort , forcing an abnormal exit from the entire program. Because terminate ends the program, it is usually a very bad idea for a destructor to do anything that might cause an exception. The standard library types all guarantee that their destructors will not raise an exception.
Unlike destructors, it is often the case that something done inside a constructor might throw an exception. If an exception occurs while constructing an object, then the object might be only partially constructed. Some of its members might have been initialized, and others might not have been initialized before the exception occurs. Even if the object is only partially constructed, we are guaranteed that the constructed members will be properly destroyed. Similarly, an exception might occur when initializing the elements of an array or other container type. Again, we are guaranteed that the constructed elements will be destroyed.
uncaught exceptions terminate the program.
3. Catching an Exception
The exception specifier in a catch clause looks like a parameter list that contains exactly one parameter. The exception specifier is a type name followed by an optional parameter name. During the search for a matching catch , the catch that is found is not necessarily the one that matches the exception best. Instead, the catch that is selected is the first catch found that can handle the exception. As a consequence, in a list of catch clauses, the most specialized catch must appear first. Most conversions are not allowed the types of the exception and the catch specifier must match exactly with only a few possible differences:
Conversions from non const to const are allowed. That is, a throw of a non const object can match a catch specified to take a const reference.
Conversions from derived type to base type are allowed.
An array is converted to a pointer to the type of the array; a function is converted to the appropriate pointer to function type.
In particular, neither the standard arithmetic conversions nor conversions defined for class types are permitted.
When a catch is entered, the catch parameter is initialized from the exception object. As with a function parameter, the exception-specifier type might be a reference. The exception object itself is a copy of the object that was thrown. Whether the exception object is copied again into the catch site depends on the exception-specifier type. Like a parameter declaration, an exception specifier for a base class can be used to catch an exception object of a derived type. Usually, a catch clause that handles an exception of a type related by inheritance ought to define its parameter as a reference. Because objects (as opposed to references) are not polymorphic.
Because catch clauses are matched in the order in which they appear, programs that use exceptions from an inheritance hierarchy must order their catch clauses so that handlers for a derived type occurs before a catch for its base type.
4. Rethrow
A catch can pass the exception out to another catch further up the list of function calls by rethrowing the exception. A rethrow is a throw that is not followed by a type or an expression: throw; An empty throw can appear only in a catch or in a function called (directly or indirectly) from a catch. If an empty throw is encountered when a handler is not active, terminate is called.
The exception that is thrown is the original exception object, not the catch parameter. When a catch parameter is a base type, then we cannot know the actual type thrown by a rethrow expression. That type depends on the dynamic type of the exception object, not the static type of the catch parameter. In general, a catch might change its parameter. If, after changing its parameter, the catch rethrows the exception, then those changes will be propagated only if the exception specifier is a reference:
catch (my_error &eObj) { // specifier is a reference type
    eObj.status = severeErr; // modifies the exception object
    throw; // the status member of the exception object is severeErr
} catch (other_error eObj) { // specifier is a nonreference type
    eObj.status = badErr; // modifies local copy only
    throw; // the status member of the exception rethrown is unchanged
}
5. The Catch-All Handler
A catch(…) is often used in combination with a rethrow expression. The catch does whatever local work can be done and then rethrows the exception:
voidmanip(){ try { // actions that cause an exception to be thrown } catch (...) { // work to partially handle the exception throw; } }
6. Function Try Blocks and Constructors
Constructor initializers are processed before the constructor body is entered. A catch clause inside the constructor body cannot handle an exception that might occur while processing a constructor initializer. To handle an exception from a constructor initializer, we must write the constructor as a function try block.
2. Initializing and Assigning Pointers to Functions
When we use a function name without calling it, the name is automatically treated as a pointer to a function.
cmpFcn pf1 = lengthCompare; \\ automatically converted to a function pointer cmpFcn pf2 = &lengthCompare;
string::size_type sumLength(conststring&, conststring&); boolcstringCompare(char*, char*); // pointer to function returning bool taking two const string& cmpFcn pf; pf = sumLength; // error: return type differs
A pointer to a function can be used to call the function to which it refers. We can use the pointer directly there is no need to use the dereference operator to call the function
// third parameter is a function type and is automatically treated as a pointer to function voiduseBigger(conststring &, conststring &, bool(conststring &, conststring &));
// equivalent declaration: explicitly define the parameter as a pointer to function voiduseBigger(conststring &, conststring &, bool (*)(conststring &, conststring &));
4. Returning a Pointer to Function
int (*ff(int))(int*, int), The best way to read function pointer declarations is from the inside out, starting with the name being declared. Typedefs can make such declarations considerably easier to read:
// PF is a pointer to a function returning an int, taking an int* and an int typedefint(*PF)(int*, int); PF ff(int); // ff returns a pointer to function
We can define a parameter as a function type. A function return type must be a pointer to function; it cannot be a function. An argument to a parameter that has a function type is automatically converted to the corresponding pointer to function type. The same conversion does not happen when returning a function:
// func is a functiontype, not a pointer to function! typedef int func(int*, int); void f1(func); // ok: f1 has a parameter of functiontype func f2(int); // error: f2 has a returntype of functiontype func *f3(int); // ok: f3 returns a pointer to functiontype
A function template can be overloaded: We can define multiple function templates with the same name but differing numbers or types of parameters. We also can define ordinary nontemplate functions with the same name as a function template. However, overloaded function templates may lead to ambiguities. The steps used to resolve a call to an overloaded function in which there are both ordinary functions and function templates are as follows:
Build the set of candidate functions for this function name, including: a. Any ordinary function with the same name as the called function. b. Any function-template instantiation for which template argument deduction finds template arguments that match the function arguments used in the call.
Determine which, if any, of the ordinary functions are viable. Each template instance in the candidate set is viable, because template argument deduction ensures that the function could be called.
Rank the viable functions by the kinds of conversions, if any, required to make the call, remembering that the conversions allowed to call an instance of a template function are limited. a. If only one function is selected, call this function. b. If the call is ambiguous, remove any function template instances from the set of viable functions.
Rerank the viable functions excluding the function template instantiations. a. If only one function is selected, call this function. b. Otherwise, the call is ambiguous.
2. An Example of Function-Template Matching
template <typename T> int compare(const T&, const T&); template <class U, class V> int compare(U, U, V); int compare(constchar*, constchar*);
// calls compare(const T&, const T&) with T bound to int compare(1, 0);
// calls compare(U, U, V), with U and V bound to vector<int>::iterator vector<int> ivec1(10), ivec2(20); compare(ivec1.begin(), ivec1.end(), ivec2.begin()); int ia1[] = {0,1,2,3,4,5,6,7,8,9};
// calls compare(U, U, V) with U bound to int* and V bound to vector<int>::iterator compare(ia1, ia1 + 10, ivec1.begin());
// calls the ordinary function taking constchar* parameters constchar const_arr1[] = "world", const_arr2[] = "hi"; compare(const_arr1, const_arr2);
// calls the ordinary function taking constchar* parameters char ch_arr1[] = "world", ch_arr2[] = "hi"; compare(ch_arr1, ch_arr2);
再进行分析前,先看一个小例子:
int compare(constchar (&v1)[3], constchar (&v2)[3]); int compare(constchar *v1, constchar *v2); int main(int argc, char **argv) { constchar array1[] = "wo"; constchar array2[] = "hi";
compare(array1, array2); }
error: call of overloaded ‘compare(constchar [3], constchar [3])’ is ambiguous note: candidates are: int compare(constchar (&)[3], constchar (&)[3]) note: int compare(constchar*, constchar*) // 即编译器认为这个两个函数是同样好的。
Let’s look at two examples of why it is hard to design overloaded functions that work properly when there are both template and nontemplate versions in the overload set. First, consider a call to compare using pointers instead of the arrays themselves:
This call matches the template version! Ordinarily, we expect to get the same function whether we pass an array or a pointer to an element to that array. In this case, however, the function template is an exact match for the call, binding char to T. The plain version still requires a conversion from char to const char* , so the function template is preferred. 此处没有理解啊???
Another change that has surprising results is what happens if the template version of compare has a parameter of type T instead of a const reference to T:
template <typename T> int compare2(T, T);
// calls compare(T, T) with T bound to char* compare(ch_arr1, ch_arr2); // calls compare(T, T) with T bound to char* compare(p1, p2); // calls the ordinary function taking constchar* parameters compare(const_arr1, const_arr2); constchar *cp1 = const_arr1, *cp2 = const_arr2; // calls the ordinary function taking constchar* parameters compare(cp1, cp2);
In these cases, the plain function and the function template are exact matches. As always, when the match is equally good, the nontemplate version is preferred.
It is hard to design overloaded function sets involving both function templates and nontemplate functions. Because of the likelihood of surprise to users of the functions, it is almost always better to define a function-template specialization than to use a nontemplate version.
Our Queue class has a problem similar to the one in compare when used with C-style strings. In this case, the problem is in the push function. That function copies the value it’s given to create a new element in the Queue. By default, copying a C-style character string copies only the pointer, not the characters.
template<> class Queue<constchar*> { public: // no copy control: Synthesized versions work for this class // similarly, no need for explicit default constructor either void push(constchar*); void pop() {real_queue.pop();} bool empty() const {return real_queue.empty();} // Note: returntype does not match template parameter type std::string front() {return real_queue.front();} const std::string &front() const {return real_queue.front();} private: Queue<std::string> real_queue; // forward calls to real_queue };
It is worth noting that a specialization may define completely different members than the template itself. If a specialization fails to define a member from the template, that member may not be used on objects of the specilization type. The member definitions of the class template are not used to create the definitions for the members of an explicit specialization.
A class template specialization ought to define the same interface as the template it specializes. Doing otherwise will surprise users when they attempt to use a member that is not defined.
2. Class Specialization Definition
When a member is defined outside the class specialization, it is not preceded by the tokens template<>.
If we look a bit more deeply at our class, we can see that we can simplify our code: Rather than specializing the whole template, we can specialize just the push and pop members. We’ll specialize push to copy the character array and pop to free the memory we used for that copy:
template <> void Queue<constchar*>::push(constchar *const &val) { // allocate a new character array and copy characters from val char* new_item = newchar[strlen(val) + 1]; strncpy(new_item, val, strlen(val) + 1); // store pointer to newly allocated and initialized element QueueItem<constchar*> *pt = new QueueItem<constchar*>(new_item); // put item onto existing queue if (empty()) head = tail = pt; // queue has only one element else { tail->next = pt; // add new element to end of queue tail = pt; } }
template <> void Queue<constchar*>::pop() { // remember head so we can delete it QueueItem<constchar*> *p = head; delete head->item; // delete the array allocated in push head = head->next; // head now points to next element delete p; // delete old head element }
4. Specialization Declarations
Member specializations are declared just as any other function template specialization. They must start with an empty template parameter list:
// push and pop specialized forconstchar* template <> voidQueue<constchar*>::push(constchar* const &); template <> voidQueue<constchar*>::pop();
5. *** Class-Template Partial Specializations ***
If a class template has more than one template parameter, we might want to specialize some but not all of the template parameters. We can do so using a class template partial specialization:
template <class T1, class T2> class some_template { public: void print() { cout << "hello" << endl; } };
// partial specialization: fixes T2asintand allows T1 to vary template <class T1> class some_template<T1, int> { };
As with any other class template, a partial specialization is instantiated implicitly when used in a program:
The definition of a partial specialization is completely disjointed from the definition of the generic template. The partial specialization may have a completely different set of members from the generic class template. The generic definitions for the members of a class template are never used to instantiate the members of the class template partial specialization.
Demo<double, int> d;
d.print();

// error: ‘class Demo<double, int>’ has no member named ‘print’
To create a Handle , a user will be expected to pass the address of a dynamically allocated object of the type (or a type derived from that type) managed by the Handle . From that point on, the Handle will “own” the given object. In particular, the Handle class will assume responsibility for deleting that object once there are no longer any Handle s attached to it. Once an object is bound to a Handle, the user must not delete that object.
template <class T> class Handle { public: // unbound handle Handle(T *p = 0): ptr(p), use(newsize_t(1)) { } // overloaded operators to support pointer behavior T& operator*(); T* operator->(); const T& operator*() const; const T* operator->() const; // copy control: normal pointer behavior, but last Handle deletes the object Handle(const Handle& h): ptr(h.ptr), use(h.use) { ++*use; } Handle& operator=(const Handle&); ~Handle() { rem_ref(); } private: T* ptr; // shared object size_t *use; // count of how many Handle spointto *ptr voidrem_ref() { if (--*use == 0) { delete ptr; delete use; } } };
template <class T> inline Handle<T>& Handle<T>::operator=(const Handle &rhs) { ++*rhs.use; // protect against self-assignment rem_ref(); // decrement use count and delete pointers if needed ptr = rhs.ptr; use = rhs.use; return *this; }
2. Using the Handle
We intend this class to be used by other classes in their internal implementations. However, as an aid to understanding how the Handle class works, we’ll look at a simpler example first. This example illustrates the behavior of the Handle by allocating an int and binding a Handle to that newly allocated object:
{ // new scope // user allocates but must not delete the object to which the Handle is attached Handle<int> hp(newint(42)); { // new scope Handle<int> hp2 = hp; // copies pointer; use count incremented cout << *hp << " " << *hp2 << endl; // prints 42 42 *hp2 = 10; // changes value of shared underlying int } // hp2 goes out of scope; use count is decremented cout << *hp << endl; // prints 10 } // hp goes out of scope; its destructor deletes the int
As an example of using Handle in a class implementation, we might reimplement our Sales_item class. This version of the class defines the same interface, but we can eliminate the copy-control members by replacing the pointer to Item_base by a Handle:
classSales_item{ public: // default constructor: unbound handle Sales_item(): h() { } // copy item and attach handle to the copy Sales_item(const Item_base &item): h(item.clone()) { } // no copy control members: synthesized versions work // member access operators: forward their work to the Handle class const Item_base& operator*() const { return *h; } const Item_base* operator->() const { return h.operator->(); } private: Handle<Item_base> h; // use-counted handle };
3. *** Template Specializations ***
It is not always possible to write a single template that is best suited for every possible template argument with which the template might be instantiated. In some cases, the general template definition is simply wrong for a type. The general definition might not compile or might do the wrong thing. At other times, we may be able to take advantage of some specific knowledge about a type to write a more efficient function than the one that is instantiated from the template. Let’s look again at our compare function template. If we call this template definition on two const char* arguments, the function compares the pointer values.
template <typename T> int compare(const T &v1, const T &v2) { if (v1 < v2) return -1; if (v2 < v1) return1; return0; }
4. Specializing a Function Template
A template spacialization is a separate definition in which the actual type(s) or value(s) of one or more template parameter(s) is (are) specified. The declaration for the specialization must match that of the corresponding template.
// special version of compare to handle C-style character strings template <> int compare<constchar*>(constchar* const &v1, constchar* const &v2) { return strcmp(v1, v2); }
Now when we call compare , passing it two character pointers, the compiler will call our specialized version. It will call the generic version for any other argument types (including plain char*,也就是说要完全匹配):
constchar *cp1 = "world", *cp2 = "hi"; int i1, i2; compare(cp1, cp2); // calls the specialization compare(i1, i2); // calls the generic version instantiated with int
As with any function, we can declare a function template specialization without defining it. A template specialization declaration looks like the definition but omits the function body. If the template arguments can be inferred from the function parameter list, there is no need to explicitly specify the template arguments:
// error: function parameter list missing template<> int compare<constchar*>;
// ok: explicit template argument constchar* deduced from parameter types template<> int compare(constchar* const&, constchar* const&);
5. Function Overloading versus Template Specializations
Omitting the empty template parameter list, template<> , on a specialization may have surprising effects. If the specialization syntax is missing, then the effect is to declare an overloaded nontemplate version of the function:
// generictemplate definition template <class T> int compare(const T& t1, const T& t2) { /* ... */ } // OK: ordinary function declaration int compare(constchar* const&, constchar* const&);
The definition of compare does not define a template specialization. Instead, it declares an ordinary function with a return type and a parameter list that could match those of a template instantiation.
We’ll look at the interaction of overloading and templates in more detail in the next section. For now, what’s important to know is that when we define a nontemplate function, normal conversions are applied to the arguments. When we specialize a template, conversions are not applied to the argument types. In a call to a specialized version of a template, the argument type(s) in the call must match the specialized version function parameter type(s) exactly. If they don’t, then the compiler will instantiate an instantiation for the argument(s) from the template definition.
If a program consists of more than one file, the declaration for a template specialization must be visible in every file in which the specialization is used. As with other function declarations, declarations for template specializations should be included in a header file. That header should then be included in every source file that uses the specialization.
6. Ordinary Scope Rules Apply to Specializations
Before we can declare or define a specialization, a declaration for the template that it specializes must be in scope. Similarly, a declaration for the specialization must be in scope before that version of the template is called:
// define the general compare template template <class T> int compare(const T& t1, const T& t2) { /* ... */ }
int main() { // uses the generictemplate definition int i = compare("hello", "world"); // ... }
// invalid program: explicit specialization after call template<> int compare<constchar*>(constchar* const& s1, constchar* const& s2) { /* ... */ }
Any class (template or otherwise) may have a member that is itself a class or function template. Such members are referred to as member templates. One example of a member template is the assign member of the standard containers. The version assign that takes two iterators uses a template parameter to represent the type of its iterator parameters. Another member template example is the container constructor that takes two iterators. This constructor and the assign member allow containers to be built from sequences of different but compatible element types and/or different container types.
Consider the Queue copy constructor: It takes a single parameter that is a reference to a Queue . If we wanted to create a Queue by copying elements from a vector, we could not do so; there is no conversion from vector to Queue . Similarly, if we wanted to copy elements from a Queue into a Queue, we could not do so. Again, even though we can convert a short to an int , there is no conversion from Queue to Queue. The same logic applies to the Queue assignment operator, which also takes a parameter of type Queue&.
The problem is that the copy constructor and assignment operator fix both the container and element type. We’d like to define a constructor and an assign member that allow both the container and element type to vary. When we need a parameter type to vary, we need to define a function template. In this case, we’ll define the constructor and assign member to take a pair ofiterators that denote a range in some other sequence. These functions will have a single template type parameter that represents an iterator type.
2. Defining a Member Template
template <class Type> class Queue { public: // construct a Queuefrom a pair of iterators on some sequence template <class It> Queue(It beg, Itend): head(0), tail(0) { copy_elems(beg, end); } // replace current Queue by contents delimited by a pair of iterators template <class Iter> void assign(Iter, Iter); // rest ofQueue class as before private: // version of copy to be used by assign to copy elements fromiteratorrange template <class Iter> void copy_elems(Iter, Iter); }
When we define a member template outside the scope of a class template, we must include both template parameter lists:
template <class T> template <class Iter> voidQueue<T>::assign(Iter beg, Iterend) { destroy(); // remove existing elements in this Queue copy_elems(beg, end); // copy elements from the input range }
When a member template is a member of a class template, then its definition must include the class-template parameters as well as its own template parameters. The class-template parameter list comes first, followed by the member’s own template parameter list. The definition of assign starts with template <class T> template <class Iter>.
3. Member Templates and Instantiation
Like any other member, a member template is instantiated only when it is used in a program. Member templates have two kinds of template parameters: Those that are defined by the class and those defined by the member template itself. The class template parameters are fixed by the type of the object through which the function is called. The template parameters defined by the member act like parameters of ordinary function templates. These parameters are resolved through normal template argument deduction.
short a[4] = { 0, 3, 6, 9 };
// instantiates Queue<int>::Queue(short *, short *)
Queue<int> qi(a, a + 4); // copies elements from a into qi
vector<int> vi(a, a + 4);
// instantiates Queue<int>::assign(vector<int>::iterator,
//                                          vector<int>::iterator)
qi.assign(vi.begin(), vi.end());
4. The Complete Queue Class
// declaration that Queueis a template needed for friend declaration inQueueItem template <class Type> class Queue; // function template declaration must precede friend declaration inQueueItem template <class T> std::ostream& operator<<(std::ostream&, constQueue<T>&);
template <class Type> class QueueItem { friend class Queue<Type>; // needs access to item and next friend std::ostream& // defined on page 659 operator<< <Type> (std::ostream&, constQueue<Type>&); // private class: no public section QueueItem(constType &t): item(t), next(0) { } Type item; // value stored in this element QueueItem *next; // pointer to next element in the Queue };
template <class Type> class Queue { // needs access to head friend std::ostream& // defined on page 659 operator<< <Type> (std::ostream&, constQueue<Type>&); public: // empty Queue Queue(): head(0), tail(0) { } // construct a Queuefrom a pair of iterators on some sequence template <class It> Queue(It beg, Itend): head(0), tail(0) { copy_elems(beg, end); } // copy control to manage pointers to QueueItemsin the Queue Queue(constQueue &Q): head(0), tail(0) { copy_elems(Q); } Queue& operator=(constQueue&); // left as exercise for the reader ~Queue() { destroy(); } // replace current Queue by contents delimited by a pair of iterators template <class Iter> void assign(Iter, Iter); // return element from head ofQueue // unchecked operation: front on an empty Queueis undefined Type& front() { return head->item; } constType &front() const { return head->item; } void push(constType &);// defined on page 652 void pop(); // defined on page 651 bool empty() const { // trueif no elements in the Queue return head == 0; } private: QueueItem<Type> *head; // pointer to first element inQueue QueueItem<Type> *tail; // pointer to last element inQueue // utility functions used by copy constructor, assignment, and destructor void destroy(); // defined on page 651 void copy_elems(constQueue&); // defined on page 652 // version of copy to be used by assign to copy elements fromiteratorrange // defined on page 662 template <class Iter> void copy_elems(Iter, Iter); };
// InclusionCompilationModel: include member function definitions as well #include "Queue.cc"
5. static Members of Class Templates
template <class T> class Foo { public: static std::size_t count() { return ctr; } // other interface members private: static std::size_t ctr; // other implementation members };
// Eachobject shares the same Foo<int>::ctrand Foo<int>::count members Foo<int> fi, fi2, fi3;
// has static members Foo<string>::ctrand Foo<string>::count Foo<string> fs;
As with any other static data member, there must be a definition for the data member that appears outside the class. In the case of a class template static , the member definition must inidicate that it is for a class template:
Member functions of class templates are themselves function templates. Like any other function template, a member function of a class template is used to generate instantiations of that member. Unlike other function templates, the compiler does not perform template-argument deduction when instantiating class template member functions. Instead, the template parameters of a class template member function are determined by the type of the object on which the call is made. For example, when we call the push member of an object of type Queue , the push function that is instantiated is void Queue<int>::push(const int &val).
Queue<int> qi; // instantiates class Queue<int> short s = 42; int i = 42; // ok: s converted to intand passed to push qi.push(s); // instantiates Queue<int>::push(const int&) qi.push(i); // uses Queue<int>::push(const int&) f(s); // instantiates f(const short&) f(i); // instantiates f(const int&)
Member functions of a class template are instantiated only for functions that are used by the program. If a function is never used, then that member function is never instantiated. This behavior implies that types used to instantiate a template need to meet only the requirements of the operations that are actually used. When we define an object of a template type, that definition causes the class template to be instantiated. Defining an object also instantiates whichever constructor was used to initialize the object, along with any members called by that constructor:
// instantiates Queue<string> class and Queue<string>::Queue() Queue<string> qs; qs.push("hello"); // instantiates Queue<string>::push
template <class Type>voidQueue<Type>::push(const Type&val) { // allocate a new QueueItem object QueueItem<Type>*pt =new QueueItem<Type>(val); // put item onto existing queue if (empty()) head = tail = pt; // the queue now has only one element else { tail->next = pt; // add new element to end of the queue tail = pt; } }
in turn instantiates the companion QueueItem class and its constructor. The QueueItem members in Queue are pointers. Defining a pointer to a class template doesn’t instantiate the class; the class is instantiated only when we use such a pointer. Thus, QueueItem is not instantiated when we create a Queue object. Instead, the QueueItem class is instanatiated when a Queue member such as front, push, or pop is used.
2. Template Arguments for Nontype Parameters
template <int hi, int wid>
class Screen {
    public:
        // template nontype parameters used to initialize data members
        Screen(): screen(hi * wid, '#'), cursor (0),
                                height(hi), width(wid) { }
    // ...
    private:
        std::string screen;
        std::string::size_type cursor;
        std::string::size_type height, width;
};

// define Screen() outside the class
template<int hi, int wid>
Screen<hi, wid>::Screen<hi, wid>() : screen(hi * wid, '#'), cursor (0),
                                                height(hi), width(wid) { }

Screen<24,80> hp2621;
Nontype template arguments must be compile-time constant expressions.
3. Friend Declarations in Class Templates
(1) A friend declaration for an ordinary nontemplate class or function, which grants friendship to the specific named class or function.
template <class Type> class Bar {
    // grants access to ordinary, nontemplate class and function
    friend class FooBar;
    friend void fcn();
    // ...
};
(2) A friend declaration for a class template or function template, which grants access to all instances of the friend.
template <class Type> class Bar { // grants access to Foo1or templ_fcn1 parameterized by anytype template <class T> friend class Foo1; template <class T> friend void templ_fcn1(const T&); // ... };
(3) A friend declaration that grants access only to a specific instance of a class or function template.
template <class T> class Foo2;
template <class T> void templ_fcn2(const T&);
template <class Type> class Bar {
    // grants access to a single specific instance parameterized by char*
    friend class Foo2<char*>;
    friend void templ_fcn2<char*>(char* const &);
    // ...
};
More common are friend declarations of the following form:
template <class T> class Foo3; template <class T> void templ_fcn3(const T&); template <class Type> class Bar { // each instantiation ofBar grants access to the // version ofFoo3or templ_fcn3 instantiated with the same type friend class Foo3<Type>; friend void templ_fcn3<Type>(constType&); // ... };
4. Declaration Dependencies
When we grant access to all instances of a given template, there need not be a declaration for that class or function template in scope. Essentially, the compiler treats the friend declaration as a declaration of the class or function as well. When we want to restrict friendship to a specific instantiation, then the class or function must have been declared before it can be used in a friend declaration:
template <class T> class A;
template <class T> class B {
    public:
        friend class A<T>; // ok: A is known to be a template
        friend class C; // ok: C must be an ordinary, nontemplate class
        template <class S> friend class D; // ok: D is a template
        friend class E<T>; // error: E wasn't declared as a template
        friend class F<int>; // error: F wasn't declared as a template
};
5. Making a Function Template a Friend
// function template declaration must precede friend declaration inQueueItem template <class T> std::ostream& operator<<(std::ostream&, constQueue<T>&);
template <class T> class Queue;
template <class Type> class QueueItem { friend class Queue<Type>; // needs access to item and next friend std::ostream& operator<< <Type> (std::ostream&, constQueue<Type>&); // ... };
template <class Type> class Queue { // needs access to head friend std::ostream& operator<< <Type> (std::ostream&, constQueue<Type>&); };
When the compiler sees a template definition, it does not generate code immediately. The compiler produces type-specific instances of the template only when it sees a use of the template, such as when a function template is called or an object of a class template is defined.
Ordinarily, when we call a function, the compiler needs to see only a declaration for the function. Similarly, when we define an object of class type, the class definition must be available, but the definitions of the member functions need not be present. As a result, we put class definitions and function declarations in header files and definitions of ordinary and class-member functions in source files.
Templates are different: To generate an instantiation, the compiler must have access to the source code that defines the template. When we call a function template or a member function of a class template, the compiler needs the function definition. It needs the code we normally put in the source files.
Standard C++ defines two models for compiling template code: inclusion compilation model and separate compilation model . Class definitions and function declarations go in header files, and function and member definitions go in source files. The two models differ in how the definitions from the source files are made available to the compiler.
2. Inclusion Compilation Model
In the inclusion compilation model , the compiler must see the definition for any template that is used. Typically, we make the definitions available by adding a #include directive to the headers that declare function or class templates. That #include brings in the source file(s) that contain the associated definitions:
// header file utlities.h #ifndef UTLITIES_H #define UTLITIES_H template <class T> int compare(const T&, const T&); #include "utilities.cc" // get the definitions for compare etc. #endif
// implemenatation file utlities.cc template <class T> int compare(const T &v1, const T &v2) { if (v1 < v2) return -1; if (v2 < v1) return1; return0; }
Some, especially older, compilers that use the inclusion model may generate multiple instantiations. If two or more separately compiled source files use the same template, these compilers will generate an instantiation for the template in each file. Ordinarily, this approach implies that a given template will be instantiated more than once. At link time, or during a prelink phase, the compiler selects one instantiation, discarding the others. In such cases, compile-time performance can be significantly degraded if there are a lot of files that instantiate the same template. Such compilers often support mechanisms that avoid the compile-time overhead implicit in multiple instantiations of the same template. If compile time for programs using templates is too burdensome, consult your compiler’s user’s guide to see what support your compiler offers to avoid redundant instantiations.
3. Separate Compilation Model
In the separate compilation model , the compiler keeps track of the associated template definitions for us. However, we must tell the compiler to remember a given template definition. We use the export keyword to do so. A template may be defined as exported only once in a program. The declaration for this function template, should, as usual, be put in a header. The declaration must not specify export.
// **.h template<typename Type> Type sum(Type t1, Type t2);
// **.cpp exporttemplate <typename Type> Type sum(Type t1, Type t2) {}
Using export on a class template is a bit more complicated. As usual, the class declaration must go in a header file. The class body in the header should not use the export keyword. If we used export in the header, then that header could be used by only one source file in the program.
// class template header goes inshared header file template <class Type> class Queue { ... }; // Queue.ccimplementation file declares Queueas exported exporttemplate <class Type> class Queue; #include "Queue.h" // Queue member definitions
The members of an exported class are automatically declared as exported. It is also possible to declare individual members of a class template as exported. In this case, the keyword export is not specified on the class template itself. It is specified only on the specific member definitions to be exported. The definition of exported member functions need not be visible when the member is used. The definitions of any nonexported member must be treated as in the inclusion model: The definition should be placed inside the header that defines the class template.
4. Class Template Members
Class QueueItem is a private classit has no public interface. We intend this class to be used to implement Queue and have not built it for general use. Hence, it has no public members. We’ll need to make class Queue a friend of QueueItem so that its members can access the members of QueueItem.
Inside the scope of a class template, we may refer to the class using its unqualified name.
template <class Type> class QueueItem { // private class: no public section QueueItem(const Type &t): item(t), next(0) { } Type item; // value stored in this element QueueItem *next; // pointer to next element in the Queue };
template <class Type> class Queue { public: // empty Queue Queue(): head(0), tail(0) { } // copy control to manage pointers to QueueItems in the Queue Queue(const Queue &Q): head(0), tail(0) { copy_elems(Q); } Queue& operator=(const Queue&); ~Queue() { destroy(); } // return element from head of Queue // unchecked operation: front on an empty Queue is undefined Type& front() { return head->item; } const Type &front() const { return head->item; } voidpush(const Type &); // add element to back of Queue voidpop(); // remove element from head of Queue boolempty()const{ // true if no elements in the Queue return head == 0; }
private: QueueItem<Type> *head; // pointer to first element in Queue QueueItem<Type> *tail; // pointer to last element in Queue // utility functions used by copy constructor, assignment, and destructor voiddestroy(); // delete all the elements voidcopy_elems(const Queue&); // copy elements from parameter };
Ordinarily, when we use the name of a class template, we must specify the template parameters. There is one exception to this rule: Inside the scope of the class itself, we may use the unqualified name of the class template. For example, in the declarations of the default and copy constructor the name Queue is a shorthand notation that stands for Queue. Hence, the copy constructor definition is really equivalent to writing:
The compiler performs no such inference for the template parameter(s) for other templates used within the class. Hence, we must specify the type parameter when declaring pointers to the companion QueueItem class:
QueueItem<Type> *head; // pointer to first element in Queue
QueueItem<Type> *tail; // pointer to last element in Queue
A template is a blueprint; it is not itself a class or a function. The compiler uses the template to generate type-specific versions of the specified class or function. The process of generatng a type-specific instance of a template is known as instantiation. The term reflects the notion that a new “instance” of the template type or function is created.
A template is instantiated when we use it. A class template is instantiated when we refer to the an actual template class type, and a function template is instantiated when we call it or use it to initialize or assign to a pointer to function.
When we want to use a class template, we must always specify the template arguments explicitly. When we use a function template, the compiler will usually infer the template arguments for us.
2.Template Argument Deduction
To determine which functions to instantiate, the compiler looks at each argument. If the corresponding parameter was declared with a type that is a type parameter, then the compiler infers the type of the parameter from the type of the argument. The process of determining the types and values of the template arguments from the type of the function arguments is called template argument deduction. note: Multiple Type Parameter Arguments Must Match Exactly.
In general, arguments are not converted to match an existing instantiation; instead, a new instance is generated. There are only two kinds of conversions that the compiler will perform rather than generating a new instantiation:
const conversions: A function that takes a reference or pointer to a const can be called with a reference or pointer to non const object, respectively, without generating a new instantiation. If the function takes a nonreference type, then const is ignored on either the parameter type or the argument. That is, the same instantiation will be used whether we pass a const or non const object to a function defined to take a nonreference type.
array or function to pointer conversions: If the template parameter is not a reference type, then the normal pointer conversion will be applied to arguments of array or function type. An array argument will be treated as a pointer to its first element, and a function argument will be treated as a pointer to the function’s type.
template <typename T> T fobj(T, T); // arguments are copied template <typename T> T fref(const T&, const T&); // reference arguments string s1("a value"); conststring s2("another value"); fobj(s1, s2); // ok: calls f(string, string), constis ignored fref(s1, s2); // ok: non constobject s1 converted to const reference int a[10], b[42]; fobj(a, b); // ok: calls f(int*, int*) fref(a, b); // error: array types don't match; arguments aren't converted to pointers
4.Template Argument Deduction and Function Pointers
template <typename T> int compare(const T&, const T&); // pf1 points to the instantiation int compare (constint&, constint&) int (*pf1) (constint&, constint&) = compare;
It is an error if the template arguments cannot be determined from the function pointer type.
voidfunc(int(*)(conststring&, conststring&)); voidfunc(int(*)(constint&, constint&)); func(compare); // error: which instantiation of compare?
5.Function-Template Explicit Arguments
In some situations, it is not possible to deduce the types of the template arguments. In such situations, it is necessary to override the template argument deduction mechanism and explicitly specify the types or values to be used for the template parameters.
Consider the following problem. We wish to define a function template called sum that takes arguments of two differnt types. We’d like the return type to be large enough to contain the sum of two values of any two types passed in any order. How can we do that? How should we specify sum’s return type?
// T or U as the returntype? template <class T, class U> ??? sum(T, U);
// neither T nor U works asreturn typ sum(3, 4L); // second typeis larger; want U sum(T, U) sum(3L, 4); // first typeis larger; want T sum(T, U)
An alternative way to specify the return type is to introduce a third template parameter that must be explicitly specified by our caller. We supply an explicit template argument to a call in much the same way that we define an instance of a class template.
template <class T1, class T2, class T3> T1 sum(T2, T3);
// ok T1 explicitly specified; T2andT3 inferred from argument types long val3 = sum<long>(i, lng); // ok: calls long sum(int, long)
Explicit template argument(s) are matched to corresponding template parameter(s) from left to right; the first template argument is matched to the first template parameter. An explicit template argument may be omitted only for the trailing (rightmost) parameters, assuming these can be deduced from the function parameters. If our sum function had been written as
template <class T1, class T2, class T3>
T3 alternative_sum(T2, T1);

// error: can't infer initial template parameters
long val3 = alternative_sum<long>(i, lng);
// ok: All three parameters explicitly specified
long val2 = alternative_sum<long, int, long>(i, lng);
Another example where explicit template arguments would be useful is the ambiguous program
template <typename T> intcompare(const T&, const T&); // overloaded versions of func; each take a different function pointer type voidfunc(int(*)(conststring&, conststring&)); voidfunc(int(*)(constint&, constint&)); func(compare<int>); // ok: explicitly specify which version of compare
We saw that the arguments to the version of compare that has a single template type parameter must match exactly. If we wanted to call the function with compatible types, such as int and short, we could use an explicit template argument to specify either int or short as the parameter type. Write a program that uses the version of compare that has one template parameter. Call compare using an explicit template argument that will let you pass arguments of type int and short.
short sval = 123;
int ival = 2;
compare(static_cast<int>(sval), ival);
compare(static_cast<short>(ival), sval);
compare<int>(sval, ival);
compare<short>(sval, ival);
A template parameter can be a type parameter, which represents a type, or a nontype parameter , which represents a constant expression. A nontype parameter is declared following a type specifier. A type parameter is defined following the keyword class or typename.
The only meaning we can ascribe to a template parameter is to distinguish whether the parameter is a type parameter or a nontype parameter. If it is a type parameter, then we know that the parameter represents an as yet unknown type. If it is a nontype parameter, we know it is an as yet unknown value.
2.inline Function Templates
A function template can be declared inline in the same way as a nontemplate function. The specifier is placed following the template parameter list and before the return type. It is not placed in front of the template keyword.
// ok: inline specifier follows template parameter list
template <typename T> inline T min(const T&, const T&);
// error: incorrect placement of inline specifier
inline template <typename T> T min(const T&, const T&);
3.Using a Function Template
template <typename T> int compare(const T &v1, const T &v2) { if (v1 < v2) return -1; if (v2 < v1) return1; return0; }
When we called compare on two string s, we passed two string objects, which we initialized from string literals What would happen if we wrote: compare ("hi", "world").该代码会出现编译错误。因为引用的缘故,根据”hi”可将模板形参推断为char[3],根据”world”可将模板形参推断为char[6],T被推断为不同的类型。、
4.Designating Types inside the Template Definition
In addition to defining data or function members, a class may define type members. When we want to use such types inside a function template, we must tell the compiler that the name we are using refers to a type. We must be explicit because the compiler (and a reader of our program) cannot tell by inspection when a name defined by a type parameter is a type or a value. As an example, consider the following function:
template <class Parm, class U> Parm fcn(Parm* array, U value) { Parm: :size_type * p; // IfParm::size_type is a type, then a declaration // IfParm::size_type is an object, then multiplication }
We know that size_type must be a member of the type bound to Parm , but we do not know whether size_type is the name of a type or a data member. By default, the compiler assumes that such names name data members, not types. If we want the compiler to treat size_type as a type, then we must explicitly tell the compiler to do so:
template <class Parm, class U>
Parm fcn(Parm* array, U value)
{
    typename Parm::size_type * p; // ok: declares p to be a pointer
}
5.Question
Write a function template that takes a pair of values that represent iterators of unknown type. Find the value that occurs most frequently in the sequence.
template<typename T> typename T::value_type find_most(T begin, T end) { T most_iter; size_t max_num, num; map<typename T::value_type, size_t> container;
The function itself takes a single parameter, which is a reference to an array
template <class T, size_t N> void array_init(T (&parm)[N])
{
    for (size_t i = 0; i != N; ++i) {
        parm[i] = 0;
    }
}
int x[42];
double y[10];
array_init(x); // instantiates array_init(int(&)[42])
array_init(y); // instantiates array_init(double(&)[10])
A template nontype parameter is a constant value inside the template definition. A nontype parameter can be used when constant expressions are required.
// Another example: Write a function template that can determine the size of an array.
template<typename T, size_t N>
size_t size(T (&array)[N])
{
    return N;
}
7. Writing Generic Programs
The operations performed inside a function template constrains the types that can be used to instantiate the function. It is up to the programmer to guarantee that the types used as the function arguments actually support any operations that are used, and that those operations behave correctly in the context in which the template uses them.
When writing template code, it is useful to keep the number of requirements placed on the argument types as small as possible.Simple though it is, our compare function illustrates two important principles for writing generic code:
The parameters to the template are const references.
The tests in the body use only < comparisons.
By making the parameters const references, we allow types that do not allow copying. Moreover, if compare is called with large objects, then this design will also make the function run faster. we reduce the requirements on types that can be used with our compare function. Those types must support < , but they need not also support > .
We’d like to use containers (or built-in arrays) to hold objects that are related by inheritance. However, the fact that objects are not polymorphic affects how we can use containers with types in an inheritance hierarchy. Because derived objects are “sliced down” when assigned to a base object, containers and types related by inheritance do not mix well.
The only viable alternative would be to use the container to hold pointers to our objects. This strategy works, but at the cost of pushing onto our users the problem of managing the objects and pointers. The user must ensure that the objects pointed to stay around for as long as the container. If the objects are dynamically allocated, then the user must ensure that they are properly freed when the container goes away.
2. Handle Classes and Inheritance
One of the ironies of object-oriented programming in C++ is that we cannot use objects to support polymorphism. Instead, we must use pointers and references, not objects. Unfortunately, using pointers or references puts a burden on the users of our classes.
A common technique in C++ is to define a so-called handle class . The handle class stores and manages a pointer to the base class. The type of the object to which that pointer points will vary; it can point at either a base- or a derived-type object. Users access the operations of the inheritance hierarchy through the handle. Because the handle uses its pointer to execute those operations, the behavior of virtual members will vary at run time depending on the kind of object to which the handle is actually bound. Users of the handle thus obtain dynamic behavior but do not themselves have to worry about managing the pointer.
3. A Pointerlike Handle
We’ll define a pointerlike handle class, named Sales_item , to represent our Item_base hierarchy. Users of Sales_item will use it as if it were a pointer: Users will bind a Sales_item to an object of type Item_base and will then use the * and -> operations to execute Item_base operations:
// bind a handle to a Bulk_item object
Sales_item item(Bulk_item("0-201-82470-1", 35, 3, .20));
item->net_price(); // virtual call to net_price function
However, users won’t have to manage the object to which the handle points; the Sales_item class will do that part of the job. When users call a function through a Sales_item , they’ll get polymorphic behavior.
The use-counted classes we’ve used so far have used a companion class to store the pointer and associated use count. In this class, we’ll use a different design. The Sales_item class will have two data members, both of which are pointers: One pointer will point to the Item_base object and the other will point to the use count. The Item_base pointer might point to an Item_base object or an object of a type derived from Item_base.
class Sales_item { public: // default constructor: unbound handle Sales_item(): p(0), use(newstd::size_t(1)) { } // attaches a handle to a copy of the Item_base object Sales_item(const Item_base&); // copy control members to manage the use count and pointers Sales_item(const Sales_item &i): p(i.p), use(i.use) { ++*use; } ~Sales_item() { decr_use(); } Sales_item& operator=(const Sales_item&); // member access operators const Item_base *operator->() const { if (p) return p; elsethrowstd::logic_error("unbound Sales_item"); } const Item_base &operator*() const { if (p) return *p; elsethrowstd::logic_error("unbound Sales_item"); } private: Item_base *p; // pointer to shared item std::size_t *use; // pointer to shared use count // called by both destructor and assignment operator to free pointers voiddecr_use() { if (--*use == 0) { delete p; delete use; } } };
Sales_item& Sales_item::operator=(const Sales_item &rhs) { ++*rhs.use; decr_use(); p = rhs.p; use = rhs.use; return *this; }
Sales_item(const Item_base&);The constructor will allocate a new object of the appropriate type and copy the parameter into that newly allocated object. That way the Sales_item class will own the object and can guarantee that the object is not deleted until the last Sales_item attached to the object goes away. To implement the constructor that takes an Item_base , we must first solve a problem: We do not know the actual type of the object that the constructor is given. We know that it is an Item_base or an object of a type derived from Item_base. The common approach to solving this problem is to define a virtual operation to do the copy, which we’ll name clone.
class Item_base { public: virtual Item_base* clone() const { returnnew Item_base(*this); } }; class Bulk_item : public Item_base { public: Bulk_item* clone() const { returnnew Bulk_item(*this); } };
If the base instance of a virtual function returns a reference or pointer to a class type, the derived version of the virtual may return a class publicly derived from the class returned by the base class instance (or a pointer or a reference to a class type).
1. Using a Derived Object to Initialize or Assign a Base Object
Because there is a conversion from reference to derived to reference to base, these copy-control members can be used to initialize or assign a base object from a derived object:
Item_base item; // object of base type
Bulk_item bulk; // object of derived type
// ok: uses Item_base::Item_base(const Item_base&) constructor
Item_base item(bulk); // bulk is "sliced down" to its Item_base portion
// ok: calls Item_base::operator=(const Item_base&)
item = bulk; // bulk is "sliced down" to its Item_base portion
When we call the Item_base copy constructor or assignment operator on an object of type Bulk_item , the following steps happen:
The Bulk_item object is converted to a reference to Item_base, which means only that an Item_base reference is bound to the Bulk_item object.
That reference is passed as an argument to the copy constructor or assignment operator.
Those operators use the Item_base part of Bulk_item to initialize and assign, respectively, the members of the Item_base on which the constructor or assignment was called.
Once the operator completes, the object is an Item_base . It contains a copy of the Item_base part of the Bulk_item from which it was initialized or assigned, but the Bulk_item parts of the argument are ignored.
classBulk_item : publicItem_base { public: Bulk_item(): min_qty(0), discount(0.0) { } // as before };
This constructor uses the constructor initializer list to initialize its min_qty and discount members. The constructor initializer also implicitly invokes the Item_base default constructor to initialize its base-class part. The effect of running this constructor is that first the Item_base part is initialized using the Item_base default constructor. That constructor sets isbn to the empty string and price to zero. After the Item_base constructor finishes, the members of the Bulk_item part are initialized, and the (empty) body of the constructor is executed. The constructor initializer list supplies initial values for a class’ base class and members. It does not specify the order in which those initializations are done. The base class is initialized first and then the members of the derived class are initialized in the order in which they are declared. A class may initialize only its own immediate base class. An immediate base class is the class named in the derivation list.
3. Defining a Derived Copy Constructor
If a derived class explicitly defines its own copy constructor or assignment operator, that definition completely overrides the defaults. The copy constructor and assignment operator for inherited classes are responsible for copying or assigning their base- class components as well as the members in the class itself.
classBase{ /* ... */ }; classDerived: publicBase{ public: // Base::Base(const Base&) not invoked automatically Derived(const Derived& d): Base(d) /* other member initialization */ { /*... */ } };
The initializer Base(d) converts the derived object, d , to a reference to its base part and invokes the base-class copy constructor. Had the initializer for the base class been omitted,
the effect would be to run the Base default constructor to initialize the base part of the object. Assuming that the initialization of the Derived members copied the corresponding elements from d , then the newly constructed object would be oddly configured: Its Base part would hold default values, while its Derived members would be copies of another object.
4. Derived-Class Assignment Operator
If the derived class defines its own assignment operator, then that operator must assign the base part explicitly:
// Base::operator=(const Base&) not invoked automatically
Derived &Derived::operator=(const Derived &rhs)
{
    if (this != &rhs) {
        Base::operator=(rhs); // assigns the base part
        // do whatever needed to clean up the old value in the derived part
        // assign the members from the derived
    }
    return *this;
}
5. Derived-Class Destructor
The destructor works differently from the copy constructor and assignment operator: The derived destructor is never responsible for destroying the members of its base objects. The compiler always implicitly invokes the destructor for the base part of a derived object. Objects are destroyed in the opposite order from which they are constructed: The derived destructor is run first, and then the base-class destructors are invoked, walking back up the inheritance hierarchy. The root class of an inheritance hierarchy should define a virtual destructor even if the destructor has no work to do.
6. Virtuals in Constructors and Destructors
A derived object is constructed by first running a base-class constructor to initialize the base part of the object. While the base-class constructor is executing, the derived part of the object is uninitialized. In effect, the object is not yet a derived object.
When a derived object is destroyed, its derived part is destroyed first, and then its base parts are destroyed in the reverse order of how they were constructed.
In both cases, while a constructor or destructor is running, the object is incomplete. To accommodate this incompleteness, the compiler treats the object as if its type changes during construction or destruction. Inside a base-class constructor or destructor, a derived object is treated as if it were an object of the base type.
If a virtual is called from inside a constructor or destructor, then the version that is run is the one defined for the type of the constructor or destructor itself.
7. Name Collisions and Inheritance
A derived-class member with the same name as a member of the base class hides direct access to the base-class member. We can access a hidden base-class member by using the scope operator. The derived-class member hides the base-class member within the scope of the derived class. The base member is hidden, even if the prototypes of the functions differ :
struct Base { intmemfcn(); }; struct Derived : Base { intmemfcn(int); // hides memfcn in the base }; Derived d; Base b; b.memfcn(); // calls Base::memfcn d.memfcn(10); // calls Derived::memfcn d.memfcn(); // error: memfcn with no arguments is hidden d.Base::memfcn(); // ok: calls Base::memfcn
8. Name Lookup and Inheritance
Understanding how function calls are resolved is crucial to understanding inheritance hierarchies in C++. The following four steps are followed:
Start by determining the static type of the object, reference, or pointer through which the function is called.
Look for the function in that class. If it is not found, look in the immediate base class and continue up the chain of classes until either the function is found or the last class is searched. If the name is not found in the class or its enclosing base classes, then the call is in error.
Once the name is found, do normal type-checking to see if this call is legal given the definition that was found.
Assuming the call is legal, the compiler generates code. If the function is virtual and the call is through a reference or pointer, then the compiler generates code to determine which version to run based on the dynamic type of the object. Otherwise, the compiler generates code to call the function directly.
protected has important property: A derived object may access the protected members of its base class only through a derived object. The derived class has no special access to the protected members of base type objects. 这里说的情况是在Bulk_item的成员函数里面。如果是在user code代码里面,protected属性的成员肯定是不能访问的。
void Bulk_item::memfcn(const Bulk_item &d, const Item_base &b)
{
    // attempt to use protected member
    double ret = price; // ok: uses this->price
    ret = d.price; // ok: uses price from a Bulk_item object
    ret = b.price; // error: no access to price from an Item_base
}
2. Derived Classes and virtual Functions
If a derived class does not redefine a virtual, then the version it uses is the one defined in its base class. A derived type must include a declaration for each inherited member it intends to redefine. With one exception, the declaration of a virtual function in the derived class must exactly match the way the function is defined in the base. That exception applies to virtuals that return a reference (or pointer) to a type that is itself a base class. A virtual function in a derived class can return a reference (or pointer) to a class that is publicly derived from the type returned by the base-class function.
3. Overriding the Virtual Mechanism
In some cases, we want to override the virtual mechanism and force a call to use a particular version of a virtual function. We can do so by using the scope operator:
Item_base *baseP = &derived;
// calls version from the base class regardless of the dynamic type of baseP
double d = baseP->Item_base::net_price(42);
This code forces the call to net_price to be resolved to the version defined in Item_base . The call will be resolved at compile time. When a derived virtual calls the base-class version, it must do so explicitly using the scope operator. If the derived function neglected to do so, then the call would be resolved at run time and would be a call to itself, resulting in an infinite recursion.
4. 无题
A publicly derived class inherits the interface of its base class; it has the same interface as its base class. In well-designed class hierarchies, objects of a publicly derived class can be used wherever an object of the base class is expected. By far the most common form of inheritance is public.
5. restore the access level of an inherited member
class Base {
    public:
        std::size_t size() const { return n; }
    protected:
    std::size_t n;
};
class Derived : private Base { . . . };
In this hierarchy, size is public in Base but private in Derived. To make size public in Derived we can add a using declaration for it to a public section in Derived. By changing the definition of Derived as follows, we can make the size member accessible to users and n accessible to classes subsequently derived from Derived:
class Derived : private Base {
    public:
        // maintain access levels for members related to the size of the object
        using Base::size;
    protected:
        using Base::n;
        // ...
};
The derived class can restore the access level of an inherited member. The access level cannot be made more or less restrictive than the level originally specified within the base class.
6. Default Inheritance Protection Levels
A derived class defined using the class keyword has private inheritance. A class is defined with the struct keyword, has public inheritance.The only differences between class and struct are the default protection level for members and the default protection level for a derivation.
classBase{ /* ... */ }; structD1 : Base{ /* ... */ }; // public inheritance by default classD2 : Base{ /* ... */ }; // private inheritance by default
/proc/sys/fs/file-max:This file defines a system-wide limit on the number of open files for all processes. (See also setrlimit(2), which can be used by a process to set the per-process limit, RLIMIT_NOFILE, on the number of files it may open.) If you get lots of error messages about running out of file handles, try increasing this value: echo 100000 > /proc/sys/fs/file-max. The kernel constant NR_OPEN imposes an upper limit on the value that may be placed in file-max. If you increase /proc/sys/fs/file-max, be sure to increase /proc/sys/fs/inode-max to 3-4 times the new value of /proc/sys/fs/file-max, or you will run out of inodes.
(1)ulimit is a bash built_in command. It provides control over the resources available to the shell and to processes started by it. 执行ulimit -n命令可以看到本次登录的shell会话的文件描述符的限制,一般情况下是1024。当然可以通过ulimit -SHn 102400 命令来修改该限制。 (2) The getrlimit() and setrlimit() system calls get and set resource limits respectively. Each resource has an associated soft and hard limit, as defined by the rlimit structure:
struct rlimit {
    rlim_t rlim_cur;  /* Soft limit */
    rlim_t rlim_max;  /* Hard limit (ceiling for rlim_cur) */
};
The soft limit is the value that the kernel enforces for the corresponding resource. The hard limit acts as a ceiling for the soft limit: an unprivileged process may only set its soft limit to a value in the range from 0 up to the hard limit, and (irreversibly) lower its hard limit. A privileged process may make arbitrary changes to either limit value. The value RLIM_INFINITY denotes no limit on a resource.
方法一: 命令: uname -a // uname is short for unix name 作用: 查看系统内核版本号及系统名称 方法二: 命令: cat /proc/version 作用: 查看目录”/proc”下version的信息,也可以得到当前系统的内核版本号及系统名称
补充说明:/proc文件系统,它不是普通的文件系统,而是系统内核的映像。The proc file system is a pseudo-file system which is used as an interface to kernel data structures. It is commonly mounted at /proc. Most of it is read-only, but some files allow kernel variables to be changed. 我们使用命令“uname -a”的信息就是从该文件获取的。
2. 查看进程打开的所有文件描述符
方法一:ll /proc/<进程PID>/fd/ 方法二:lsof -p <进程PID>
3. 设置和查看系统资源限制ulimit
ulimit(short for user limits): it provides control over the resources available to the shell and to processes started by it.
Syntax ulimit [-acdfHlmnpsStuv] [limit]
Options
-SChangeand report the soft limit associated with a resource. -HChangeand report the hard limit associated with a resource.
-a All current limits are reported. -c The maximum size of core files created. -d The maximum size of a process's data segment. -f The maximum size of files created by the shell(default option) -l The maximum size that can be locked into memory. -m The maximum resident set size. -n The maximum number of open file descriptors. -p The pipe buffer size. -s The maximum stack size. -t The maximum amount of cpu time in seconds. -u The maximum number of processes available to a single user. -v The maximum amount of virtual memory available to the process.
We should set nonblocking mode on all network handles, and use select() or poll() to tell which network handle has data waiting. With this scheme, the kernel tells you whether a file descriptor is ready. It’s particularly important to remember that readiness notification from the kernel is only a hint; the file descriptor might not be ready anymore when you try to read from it. That’s why it’s important to use nonblocking mode when using readiness notification.
select的基本用法不再叙述。select uses descriptor sets, typically an array of integers, with each bit in each integer corresponding to a descriptor. For example, using 32-bit integers, the first element of the array corresponds to descriptors 0 through 31, the second element of the array corresponds to descriptors 32 through 63, and so on. All the implementation details are irrelevant to the application and are hidden in the fd_set datatype and the following four macros:
voidFD_ZERO(fd_set *fdset); /* clear all bits in fdset */ voidFD_SET(int fd, fd_set *fdset); /* turn on the bit for fd in fdset */ voidFD_CLR(int fd, fd_set *fdset); /* turn off the bit for fd in fdset */ intFD_ISSET(int fd, fd_set *fdset); /* is the bit for fd on in fdset ? */
We allocate a descriptor set of the fd_set datatype, we set and test the bits in the set using these macros, and we can also assign it to another descriptor set across an equals sign (=) in C. The constant FD_SETSIZE, defined by including , is the number of descriptors in the fd_set datatype. Its value is often 1024.
也就是说,使用select有一个限制,那就是它支持的文件描述符的数量,一般是1024。Many implementations have declarations similar to the following, which are taken from the 4.4BSD header:
#ifndef FD_SETSIZE
#define FD_SETSIZE      256
#endif
This makes us think that we can just #define FD_SETSIZE to some larger value before including this header to increase the size of the descriptor sets used by select. Unfortunately, this normally does not work. To see what is wrong, notice that Figure 16.53 of TCPv2 declares three descriptor sets within the kernel and also uses the kernel’s definition of FD_SETSIZE as the upper limit. The only way to increase the size of the descriptor sets is to increase the value of FD_SETSIZE and then recompile the kernel. Changing the value without recompiling the kernel is inadequate. 但是自己在实验的时候,发现输出1024,这是为什么呢?难道编译的是否内核里的宏定义直接覆盖用户提供的。
边缘触发(edge-triggered)ET: 每当状态变化时,触发一个事件(仅当状态由not ready 到 ready时触发一个事件) Eedge-triggered readiness notification means you give the kernel a file descriptor, and later, when that descriptor transitions from not ready to ready, the kernel notifies you somehow. It then assumes you know the file descriptor is ready, and will not send any more readiness notifications of that type for that file descriptor until you do something that causes the file descriptor to no longer be ready (e.g. until you receive the EWOULDBLOCK error on a send, recv, or accept call, or a send or recv transfers less than the requested number of bytes). epoll is the recommended edge-triggered poll replacement for the 2.6 Linux kernel.
As is known, some blocking calls like read and write would return -1 and set errno to EINTR, and we need handle this. My question is: Does this apply for non-blocking calls, e.g, set socket to O_NONBLOCK?
答案是:对于非阻塞调用,它们不会返回EINTR错误。 If you take a look at the man pages of various systems for the following socket functions bind(), connect(), send(), and receive(), or look those up in the POSIX standard, you’ll notice something interesting: All these functions except one may return -1 and set errno to EINTR. The one function that is not documented to ever fail with EINTR is bind(). And bind() is also the only function of that list that will never block by default. So it seems that only blocking functions may fail because of EINTR, including read() and write(), yet if these functions never block, they also will never fail with EINTR and if you use O_NONBLOCK, those functions will never block.
Of course, even with non-blocking I/O, the read call may have temporarily interrupted by a signal but why would the system have to indicate that? Every function call, whether this is a system function or one written by the user, may be temporarily interrupted by a signal, really every single one, no exception. If the system would have to inform the user whenever that happens, all system functions could possibly fail because of EINTR. However, even if there was a signal interruption, the functions usually perform their task all the way to the end, that’s why this interruption is irrelevant. The error EINTR is used to tell the caller that the action he has requested was not performed because of a signal interruption, but in case of non-blocking I/O, there is no reason why the function should not perform the read or the write request, unless it cannot be performed right now, but then this can be indicated by an appropriate error(EAGAIN or EWOULDBLOCK ).
To confirm my theory, I took a look at the kernel of MacOS (10.8), which is still largely based on the FreeBSD kernel and it seems to confirm the suspicion. If a read call is currently not possible, as no data are available, the kernel checks for the O_NONBLOCK flag in the file descriptor flags. If this flag is set, it fails immediately with EAGAIN. If it is not set, it puts the current thread to sleep by calling a function named msleep(). This function causes the current thread to sleep until it is explicitly woken up (which is the case if data becomes ready for reading) or a timeout has been hit (e.g. you can set a receive timeout on sockets). Yet the thread is also woken up, if a signal is delivered, in which case msleep() itself returns EINTR and the next higher layer just passes this error through. So it is msleep() that produces the EINTR error, but if the O_NONBLOCK flag is set, msleep() is never called in the first place, hence this error cannot be returned.
When a process writes to a socket that has received an RST, the SIGPIPE signal is sent to the process. 这是UNIX网络编程卷一(5.13章节)中的内容。但是在实际的编程中发现,当套接字收到RST报文段后,第一次read或者write会产生ECONNRESET错误,第二次read或者write时才会触发SIGPIPE信号。这与UNIX网络编程卷一中的描述“当套接字接收到RST后,我们再执行write操作则会触发SIGPIPE信号”不一样。
The default action of this signal is to terminate the process, so the process must catch the signal to avoid being involuntarily terminated. If the process either catches the signal and returns from the signal handler, or ignores the signal, the write operation returns EPIPE. If special actions are needed when the signal occurs (writing to a log file perhaps), then the signal should be caught and any desired actions can be performed in the signal handler.
在使用非阻塞connect的时候,有以下几点需要注意: 1、When a TCP socket is set to nonblocking and then connect is called, connect returns immediately with an error of EINPROGRESS but the TCP three-way handshake continues. 2、Even though the socket is nonblocking, if the server to which we are connecting is on the same host, the connection is normally established immediately when we call connect. 3、POSIX have the following two rules regarding select and nonblocking connects:(1) When the connection completes successfully, the descriptor becomes writable. (2) When the connection establishment encounters an error, the descriptor becomes both readable and writable.
There are portability problems with various socket implementations and nonblocking connects. If an error occurred, Berkeley-derived implementations of getsockopt return 0 with the pending error returned in our variable error. But Solaris causes getsockopt itself to return –1 with errno set to the pending error.
对于一个阻塞的套接字,当我们调用connect时被信号中断了,它会返回EINTR错误。但是要注意,我们不能对这个套接字再次调用connect,否则将返回EADDRINUSE错误。此时正确的做法是调用select,就像使用非阻塞connect一样。select returns when the connection completes successfully (making the socket writable) or when the connection fails (making the socket readable and writable).
1、The principle reason for the three-way handshake is to prevent old duplicate connection initiations from causing confusion.这主要是为了防止已经失效的连接请求报文段突然又传送到了B,从而产生错误。具体看下面的场景:A发出连接请求报文段,但是该连接请求报文段因网络原因暂时滞留在某网络结点。A因为没有收到确认,于是重传一次连接请求报文段,这个重传的连接请求报文段被B接收到了,并且A也收到了确认,于是连接建立成功。它们传输完数据之后,释放连接。但是,此时第一个连接请求报文段奇迹般地又到达了B。本来这是一个早已失效的报文段,但是B误认为是A又发出的一个新的连接请求。于是向A发送确认报文段,同意建立连接。如果不采用三次握手,对B而言,当它发出确认报文段后,新的连接就建立了,但这并不是一个真实的连接,造成资源浪费。
2、如果从更深层次的角度去考虑,我们看看TCP的三次握手到底做了些什么事情。在TCP中,通讯双方都会使用序列号(sequence number)来记录自己已经发送了哪些数据。而且,接收方也会使用对方的序列号对自己已经收到的数据进行确认。从安全角度考虑,序列号不会从0开始,而是一个随机值。因为TCP是双向通讯的,双方都可以发送数据,所以双方都必须产生一个随机数来作为自己的初始序列号。当然,通讯双方也必须把自己的初始序列号告知对方,这样双方才能正常通讯。Alice和Bob之间的TCP通话是这样开始的: Alice —-> Bob // SYNchronize with my Initial Sequence Number of X Alice <—- Bob // I received your syn, I ACKnowledge that I am ready for [X+1] Alice <—- Bob // SYNchronize with my Initial Sequence Number of Y Alice —-> Bob // I received your syn, I ACKnowledge that I am ready for [Y+1] Alice将自己的初始序列号告知Bob,Bob对其进行确认;Bob将自己的初始序列号告知Alice,Alice对其进行确认。实际上,为了提高效率,第2步和第3步是在同一个报文段中完成的。 Alice —-> Bob // SYN Alice <—- Bob // SYN ACK Alice —-> Bob // ACK 所以,如果只有两次握手的话,所实现的只是Alice将自己的初始序列号告知了Bob,Bob也对其进行了确认。即只能Alice对Bob发送数据,但是Bob却不能对Alice发送数据。
3、下面的英文解释跟2是同样道理的。 To establish a connection, the three-way (or 3-step) handshake occurs: (1) SYN: The active open is performed by the client sending a SYN to the server. The client sets the segment’s sequence number to a random value A. (2) SYN-ACK: In response, the server replies with a SYN-ACK. The acknowledgment number is set to one more than the received sequence number i.e. A+1, and the sequence number that the server chooses for the packet is another random number, B. (3) ACK: Finally, the client sends an ACK back to the server. The sequence number is set to the received acknowledgement value i.e. A+1, and the acknowledgement number is set to one more than the received sequence number i.e. B+1.
At this point, both the client and server have received an acknowledgment of the connection. The steps 1, 2 establish the connection parameter (sequence number) for one direction and it is acknowledged. The steps 2, 3 establish the connection parameter (sequence number) for the other direction and it is acknowledged. With these, a full-duplex communication is established.
4、两次握手更容易遭受DoS攻击
Sender           Receiver
           SYN
------------------------> (Connection established at Receiver)

        SYN + ACK
<------------------------ (Connection established at Sender)
The above sequence of steps shows what should happen ideally. Now, how easy it is to make DoS attack. Simply, send a SYN packet to the Receiver and it would open a connection at Receiver. Sender need not even care about (SYN + ACK) packet coming back from Receiver.
2、为了保证已经失效的重复报文段(old duplicate segments)都从网络中消失。A在发送完最后一个ACK报文段后,再经过2MSL,就可以使在本连接持续的时间内所产生的所有报文段都从网络中消失。这样就可以使下一个新的连接(源IP、源端口、目的IP、目的端口完全一样)中不会出现这种旧的报文段。 To understand the second reason for the TIME_WAIT state, assume we have a TCP connection between 12.106.32.254 port 1500 and 206.168.112.219 port 21. This connection is closed and then sometime later, we establish another connection between the same IP addresses and ports: 12.106.32.254 port 1500 and 206.168.112.219 port 21. This latter connection is called an incarnation of the previous connection since the IP addresses and ports are the same. TCP must prevent old duplicates from a connection from reappearing at some later time and being misinterpreted as belonging to a new incarnation of the same connection. To do this, TCP will not initiate a new incarnation of a connection that is currently in the TIME_WAIT state. By enforcing this rule, we are guaranteed that when we successfully establish a TCP connection, all old duplicates from previous incarnations of the connection have expired in the network.
一个小插曲:EAGAIN or EWOULDBLOCK, The socket is marked nonblocking and no connections are present to be accepted. POSIX.1-2001 and POSIX.1-2008 allow either error to be returned for this case, and do not require these constants to have the same value, so a portable application should check for both possibilities.
0x03 SO_LINGER Socket Option
This option specifies how the close function operates for a connection-oriented protocol. By default, close returns immediately, but if there is any data still remaining in the socket send buffer, the system will try to deliver the data to the peer. The SO_LINGER socket option lets us change this default. This option requires the following structure to be passed between the user process and the kernel.
structlinger{ int l_onoff; /* 0=off, nonzero=on */ int l_linger; /* linger time, POSIX specifies units as seconds */ };
Calling setsockopt leads to one of the following three scenarios: 1、If l_onoff is 0, the option is turned off. The value of l_linger is ignored and the previously discussed TCP default applies: close returns immediately. 2、If l_onoff is nonzero and l_linger is zero, TCP aborts the connection when it is closed. That is, TCP discards any data still remaining in the socket send buffer and sends an RST to the peer, not the normal four-packet connection termination sequence. This avoids TCP’s TIME_WAIT state, but in doing so, leaves open the possibility of another incarnation of this connection being created within 2MSL seconds and having old duplicate segments from the just-terminated connection being incorrectly delivered to the new incarnation. 3、If l_onoff is nonzero and l_linger is nonzero, then the kernel will linger when the socket is closed. That is, if there is any data still remaining in the socket send buffer, the process is put to sleep until either: (i) all the data is sent and acknowledged by the peer TCP, or (ii) the linger time expires. If the socket has been set to nonblocking, it will not wait for the close to complete, even if the linger time is nonzero. When using this feature of the SO_LINGER option, it is important for the application to check the return value from close, because if the linger time expires before the remaining data is sent and acknowledged, close returns EWOULDBLOCK and any remaining data in the send buffer is discarded.
当我们调用close,并从其返回之后,到底意味着什么呢?The basic principle here is that a successful return from close, with the SO_LINGER socket option set, only tells us that the data we sent (and our FIN) have been acknowledged by the peer TCP. This does not tell us whether the peer application has read the data. If we do not set the SO_LINGER socket option, we do not know whether the peer TCP has acknowledged the data.
One way for the client to know that the server has read its data is to call shutdown (with a second argument of SHUT_WR) instead of close and wait for the peer to close its end of the connection.
0x04 发送RST报文段
struct linger ling;
ling.l_onoff = 1;          /* cause RST to be sent on close() */
ling.l_linger = 0;
setsockopt(sockfd, SOL\_SOCKET, SO\_LINGER, &ling, sizeof(ling));
close(sockfd);
A conversion operator is a special kind of class member function. It defines a conversion that converts a value of a class type to a value of some other type. A conversion operator is declared in the class body by specifying the keyword operator followed by the type that is the target type of the conversion.
class SmallInt { public: SmallInt(int i = 0): val(i) { if (i < 0 || i > 255) throwstd::out_of_range("Bad SmallInt initializer"); } operatorint()const{ return val; } private: std::size_t val; };
A conversion function takes the general form operator type(). A conversion function must be a member function. The function may not specify a return type, and the parameter list must be empty. A class-type conversion may not be followed by another class-type conversion. If more than one class-type conversion is needed then the code is in error. 例如,A可以转换成B,B可以转换成C,那么在需要C的地方提供一个A是错误的。
2. Explicit Conversion Cast
int a = 10;
SmallInt si(18);
int sum1 = si + a; // ok
int sum2 = static_cast<int>(si) + a; // ok, instruct compiler to cast si to int
3. Ambiguities When Two Classes Define Conversions
classIntegral; classSmallInt { public: SmallInt(Integral &); // convert from Integral to SmallInt // ... }; classIntegral { public: operatorSmallInt() const; // convert from SmallInt to Integral // ... }; voidcompute(SmallInt); Integral int_val; compute(int_val); // error: ambiguous
In this case, we cannot use a cast to resolve the ambiguity, the cast itself could use either the conversion operation or the constructor. Instead, we would need to explicitly call the conversion operator or the constructor:
compute(int_val.operator SmallInt()); // ok: use conversion operator
compute(SmallInt(int_val)); // ok: use SmallInt constructor
The best way to avoid ambiguities or surprises is to avoid writing pairs of classes where each offers an implicit conversion to the other.
4. Multiple Conversions and Overload Resolution
class SmallInt { public: // Conversions to int or double from SmallInt // Usually it is unwise to define conversions to multiple arithmetic types operatorint()const{ return val; } operatordouble()const{ return val; } // ... private: std::size_t val; }; voidcompute(int); voidcompute(double); voidcompute(longdouble); SmallInt si; compute(si); // error: ambiguous
In this case we could use the operator int to convert si and call the version of compute that takes an int. Or we could use operator double to convert si and call compute(double). The solutions is
compute(static_cast<int>(si)); // ok: convert and call compute(int)
Let’s look at overload resolution when multiple conversion constructors exist:
Correctly designing the overloaded operators, conversion constructors, and conversion functions for a class requires some care. In particular, ambiguities are easy to generate if a class defines both conversion operators and overloaded operators. A few rules of thumb can be helpful:
Never define mutually converting classes, that is, if class Foo has a constructor that takes an object of class Bar, do not give class Bar a conversion operator to type Foo.
Avoid conversions to the built-in arithmetic types. In particular, if you do define a conversion to an arithmetic type, then (1) Do not define overloaded versions of the operators that take arithmetic types. If users need to use these operators, the conversion operation will convert objects of your type, and then the built-in operators can be used. (2)Do not define a conversion to more than one arithmetic type. Let the standard conversions provide conversions to the other arithmetic types.
The easiest rule of all: Avoid defining conversion functions and limit nonexplicit constructors to those that are “obviously right.”
The compiler initializes svec by first using the default string constructor to create a temporary value. The copy constructor is then used to copy the temporary into each element of svec.
string strs[5] = {string("ff"), string("22")};
第一、二个元素用拷贝构造函数初始化,其余的用默认构造函数初始化
2、禁止复制
By declaring (but not defining) a private copy constructor, we can forestall any attempt to copy an object of the class type: Attempts to make copies in user code will be flagged as an error at compile time, and attempts to make copies in member functions or friends will result in an error at link time.
3、复制构造函数、赋值运算符、析构函数
A useful rule of thumb is that if a class needs a destructor, it will also need the assignment operator and a copy constructor. This rule is often referred to as the Rule of Three. An important difference between the destructor and the copy constructor or assignment operator is that even if we write our own destructor, the synthesized destructor is still run. Best Practice:The assignment operator often does the same work as is needed in the copy constructor and destructor. In such cases, the common work should be put in private utility functions.
4.运算符重载
An overloaded operator must have at least one operand of class or enumeration type. This rule enforces the requirement that an overloaded operator may not redefine the meaning of the operators when applied to objects of built-in type. Overloaded operators make no guarantees about the order in which operands are evaluated. In particular, the operand-evaluation guarantees of the built-in logical AND, logical OR, and comma operators are not preserved. Both operands to an overloaded version of && or || are always evaluated. The order in which those operands are evaluated is not stipulated. The order in which the operands to the comma are evaluated is also not defined. For this reason, it is usually a bad idea to overload &&, || , or the comma operator.
5.Overloading the Output Operator <<
To be consistent with the IO library, the operator should take an ostream& as its first parameter and a reference to a const object of the class type as its second. The operator should return a reference to its ostream parameter.
The ostream is non const because writing to the stream changes its state. The parameter is a reference because we cannot copy an ostream object.
6. Overloading the Input Operator >>
A more important, and less obvious, difference between input and output operators is that input operators must deal with the possibility of errors and end-of-file.
istream& operator>>(istream& in, Sales_item& s)
{
    double price;
    in >> s.isbn >> s.units_sold >> price;
    // check that the inputs succeeded
    if (in)
        s.revenue = s.units_sold * price;
    else
        s = Sales_item(); // input failed: reset object to default state
    return in;
}
Our Sales_item input operator reads the expected values and checks whether an error occurred. The kinds of errors that might happen include:
Any of the read operations could fail because an incorrect value was provided. For example, after reading isbn , the input operator assumes that the next two items will be numeric data. If nonnumeric data is input, that read and any subsequent use of the stream will fail.
Any of the reads could hit end-of-file or some other error on the input stream.
Rather than checking each read, we check once before using the data we read. If an input operator detects that the input failed, it is often a good idea to make sure that the object is in a usable and consistent state. Doing so is particularly important if the object might have been partially written before the error occurred. In addition to handling any errors that might occur, an input operator might need to set the condition state of its input istream parameter.Our input operator is quite simple, the only errors we care about are those that could happen during the reads. If the reads succeed, then our input operator is correct and has no need to do additional checking. Some input operators do need to do additional checking. For example, our input operator might check that the isbn we read is in an appropriate format. We might have read data successfully, but these data might not be suitable when interpreted as an ISBN. In such cases, the input operator might need to set the condition state to indicate failure, even though technically speaking the actual IO was successful. Usually an input operator needs to set only the failbit. Setting eofbit would imply that the file was exhausted, and setting badbit would indicate that the stream was corrupted. These errors are best left to the IO library itself to indicate.
7. Subscript Operator
One complication in defining the subscript operator is that we want it to do the right thing when used as either the left- or right-hand operand of an assignment. To appear on the left-handside, it must yield an lvalue, which we can achieve by specifying the return type as a reference. As long as subscript returns a reference, it can be used on either side of an assignment. It is also a good idea to be able to subscript const and non const objects. When applied to a const object, the return should be a const reference so that it is not usable as the target of an assignment. Ordinarily, a class that defines subscript needs to define two versions: one that is a non const member and returns a reference and one that is a const member and returns a const reference.
class Foo { public: int &operator[] (constsize_t); constint &operator[] (constsize_t) const; // other interface members private: vector<int> data; // other member data and private utility functions }; int& Foo::operator[] (constsize_t index) { return data[index]; // no range checking on index } constint& Foo::operator[] (constsize_t index) const { return data[index]; // no range checking on index }
8. Member Access Operators
To support pointerlike classes, such as iterators, the language allows the dereference ( * ) and arrow ( ->) operators to be overloaded. The dereference and arrow operators are often used in classes that implement smart pointers.
// private class for use by ScreenPtr only classScrPtr { friend classScreenPtr; Screen *sp; size_tuse; ScrPtr(Screen *p): sp(p), use(1) { } ~ScrPtr() { delete sp; } };
classScreenPtr { public: // no default constructor: ScreenPtrs must be bound to an object ScreenPtr(Screen *p): ptr(new ScrPtr(p)) { } // copy members and increment the use count ScreenPtr(const ScreenPtr &orig): ptr(orig.ptr) { ++ptr->use; } ScreenPtr& operator=(const ScreenPtr& rhs) { ++rhs.ptr->use; // increment use count on rhs first if (--ptr->use == 0) delete ptr; // if use count goes to 0 on this object, delete it ptr = rhs.ptr; return *this; } ~ScreenPtr() { if (--ptr->use == 0) delete ptr; } private: ScrPtr *ptr; };
Among the fundamental operations a pointer supports are dereference and arrow. We can give our class these operations as follows:
classScreenPtr { public: // constructor and copy control members as before Screen &operator*() { return *ptr->sp; } Screen *operator->() { return ptr->sp; } const Screen &operator*() const { return *ptr->sp; } const Screen *operator->() const { return ptr->sp; } private: ScrPtr *ptr; };
Operator arrow is unusual. It may appear to be a binary operator that takes an object and a member name, dereferencing the object in order to fetch the member. Despite appearances, the arrow operator takes no explicit parameter. There is no second parameter because the right-hand operand of -> is not an expression. Rather, the right-hand operand is an identifier that corresponds to a member of a class. There is no obvious, useful way to pass an identifier as a parameter to a function. Instead, the compiler handles the work of fetching the member. The overloaded arrow operator must return either a pointer to a class type or an object of a class type that defines its own operator arrow. When we write point->action(), the compiler evaluates this code as follows:
If point is a pointer to a class object that has a member named action , then the compiler writes code to call the action member of that object.
Otherwise, if point is an object of a class that defines operator-> , then point->action is the same as point.operator->()->action. That is, we execute operator->() on point and then repeat these three steps, using the result of executing operator-> on point.
Sales_item operator+(const Sales_item& lhs, const Sales_item& rhs) { Sales_item ret(lhs); // copy lhs into a local object that we'll return ret += rhs; // add in the contents of rhs returnret; // return ret by value }
The standard library defines a set of arithmetic, relational, and logical function-object classes. The library also defines a set of function adaptors that allow us to specialize or extend the function-object classes defined by the library or those that we define ourselves. The library function-object types are defined in the functional header. using a library function object with the algorithms:
The standard library provides a set of function adaptors with which to specialize and extend both unary and binary function objects. The function adaptors are divided into the following two categories.
Binders: A binder is a function adaptor that converts a binary function object into a unary function object by binding one of the operands to a given value.
Negators: A negator is a function adaptor that reverses the truth value of a predicate function object.
The library defines two binder adaptors: bind1st and bind2nd . Each binder takes a function object and a value. As you might expect, bind1st binds the given value to the first argument of the binary function object, and bind2nd binds the value to the second. For example, to count all the elements within a container that are less than or equal to 10 , we would pass count_if the following:
The third argument to count_if uses the bind2nd function adaptor. That adaptor returns a function object that applies the <= operator using 10 as the right-hand operand. This call to count_if counts the number of elements in the input range that are less than or equal to 10. The library also provides two negators: not1 and not2 . Again, as you might expect, not1 reverses the truth value of a unary predicate function object, and not2 reverses the truth value of a binary predicate function object. To negate our binding of the less_equal function object, we would write
Here we first bind the second operand of the less_equal object to 10 , effectively transforming that binary operation into a unary operation. We then negate the return from the operation using not1 . The effect is that each element will be tested to see if it is <= to 10. Then, the truth value of that result will be negated. In effect, this call counts those elements that are not <= to 10.
Conceptually, we can think of a constructor as executing in two phases: (1) the initialization phase and (2) a general computation phase. The computation phase consists of all the statements within the body of the constructor. Data members of class type are always initialized in the initialization phase, regardless of whether the member is initialized explicitly in the constructor initializer list. Initialization happens before the computation phase begins.
class A { public: // 调用string的复制构造函数 A(const string &str) : data(str)
Some members must be initialized in the constructor initializer. Members of a class type that do not have a default constructor and members that are const or reference types must be initialized in the constructor initializer regardless of type. The order in which members are initialized is the order in which the members are defined, not the order in which the initializer list provides.
2、隐式类型转换函数
A constructor that can be called with a single argument defines an implicit conversion from the parameter type to the class type.Ordinarily, single-parameter constructors should be explicit unless there is an obvious reason to want to define an implicit conversion. Making constructors explicit may avoid mistakes, and a user can explicitly construct an object when a conversion is useful.
3、友元的声明和范围
class Screen
{
    // Window_Mgrmust be defined before class Screen
    friend Window_Mgr& Window_Mgr::relocate(int, int, Screen&);
};
Interdependencies among friend declarations and the definitions of the friends can require some care in order to structure the classes correctly. In the previous example, class Window_Mgr must have been defined. Otherwise, class Screen could not name a Window_Mgr function as a friend. However, the relocate function itself can’t be defined until class Screen has been defined. After all, it was made a friend in order to access the members of class Screen. A friend declaration introduces the named class or nonmember function into the surrounding scope. Moreover, a friend function may be defined inside the class. The scope of the function is exported to the scope enclosing the class definition.
classX { friend classY; friend voidf(){ /* ok to define friend function in the class body */ } }; classZ { Y *ymem; // ok: declaration for class Y introduced by friend in X voidg(){ return ::f(); } // ok: declaration of f introduced by X };
4、静态成员
Because a static member is not part of any object, static member functions may not be declared as const . After all, declaring a member function as const is a promise not to modify the object of which the function is a member. Finally, static member functions may also not be declared as virtual. static data members must be defined (exactly once) outside the class body.
Like other member definitions, the definition of a static member is in class scope once the member name is seen. 静态数据成员interestRate的定义和静态函数test的定义都是在class类作用域内,所以它们都可以使用类作用域内的成员,哪怕它们是private。As a result, we can use the static member function named initRate directly without qualification as the initializer for interestRate. Note that even though initRate is private, we can use this function to initialize interestRate. The definition of interestRate, like any other member definition, is in the scope of the class and hence has access to the private members of the class. The static keyword, however, is used only on the declaration inside the class body. Definitions are not labeled static.
class Account { public: staticdoublerate(){ return interestRate; } staticvoidrate(double); // sets a new rate private: staticconstint period = 30; // interest posted every 30 days doubledaily_tbl[period]; // ok: period is constant expression };
A const static data member of integral type can be initialized within the class body.When a const static data member is initialized in the class body, the data member must still be defined outside the class definition. const int Account::period;
5、静态成员不是类对象的一部分
Because static data members are not part of any object, they can be used in ways that would be illegal for non static data members. As an example, the type of a static data member can be the class type of which it is a member. A non static data member is restricted to being declared as a pointer or a reference to an object of its class:
classBar { public: // ... private: static Bar mem1; // ok Bar *mem2; // ok Bar mem3; // error };
a static data member can be used as a default argument:
Unsigned integral type large enough to hold size of largest possible container of this container type
iterator
Type of the iterator for this container type
const_iterator
Type of the iterator that can read but not write the elements
reverse_iterator
Iterator that addresses elements in reverse order
const_reverse_iterator
Reverse iterator that can read but not write the elements
difference_type
Signed integral type large enough to hold the difference, which might be negative, between two iterators
value_type
Element type
reference
Element’s lvalue type; synonym for value_type&
const_reference
Element’s const lvalue type; same as const value_type&
Types Defined by the map Class
map::key_type
The type of the keys used to index the map.
map::mapped_type
The type of the values associated with the keys in the map.
map::value_type
A pair whose first element has type const map::key_type and second has type map::mapped_type
iterator的类型成员
value_type
该迭代器实际指向的数据的类型T
pointer
T *
reference
T&
2、对迭代器解引用返回的是元素的引用
if (!ilist.empty())
{
    // val and val2 refer to the same element
    list<int>::reference val = *ilist.begin();
    list<int>::reference val2 = ilist.front();

    // last and last2 refer to the same element
    list<int>::reference last = *--ilist.end();
    list<int>::reference last2 = ilist.back();
}
word_count is searched for the element whose key is Anna . The element is not found.
A new keyvalue pair is inserted into word_count . The key is a const string holding Anna . The value is value initialized, meaning in this case that the value is 0.
The new keyvalue pair is inserted into word_count .
The newly inserted element is fetched and is given the value 1.
For map , if the key is not already present, a new element is created and inserted into the map for that key.
4、Algorithms Never Execute Container Operations
The generic algorithms do not themselves execute container operations. They operate solely in terms of iterators and iterator operations. The fact that the algorithms operate in terms of iterators and not container operations has a perhaps surprising but essential implication: When used on “ordinary” iterators, algorithms never change the size of the underlying container. As we’ll see, algorithms may change the values of the elements stored in the container, and they may move elements around within the container. They do not, however, ever add or remove elements directly. There is a special class of iterator, the inserters, that do more than traverse the sequence to which they are bound. When we assign to these iterators, they execute insert operations on the underlying container. When an algorithm operates on one of these iterators, the iterator may have the effect of adding elements to the container. The algorithm itself, however, never does so.
5、类的前向声明
An incomplete type can be used only in limited ways. Objects of the type may not be defined. An incomplete type may be used to define only pointers or references to the type or to declare (but not define) functions that use the type as a paremeter or return type.
6、Returning *this from a const Member Function
In an ordinary non const member function, the type of this is a const pointer to the class type. We may change the value to which this points but cannot change the address that this holds. In a const member function, the type of this is a const pointer to a const class-type object. We may change neither the object to which this points nor the address that this holds. We cannot return a plain reference to the class object from a const member function. A const member function may return *this only as a const reference.
We can overload a member function based on whether it is const for the same reasons that we can overload a function based on whether a pointer parameter points to const. A const object will use only the const member. A non const object could use either member, but the non const version is a better match.
8、Parameter Lists and Function Bodies Are in Class Scope
In a member function defined outside the class, the parameter list and member-function body both appear after the member name. These are defined inside the class scope and so may refer to other class members without qualification.
9、Function Return Types Aren’t Always in Class Scope
In contrast to the parameter types, the return type appears before the member name. If the function is defined outside the class body, then the name used for the return type is outside the class scope. If the return type uses a type defined by the class, it must use the fully qualified name.
10、类成员声明中的名字查找(Name Lookup for Class Member Declarations)
1、The declarations of the class members that appear before the use of the name are considered. 2、If the lookup in step 1 is not successful, the declarations that appear in the scope in which the class is defined, and that appear before the class definition itself, are considered.
11、类成员定义中的名字查找(Name Lookup in Class Member Definitions)
1、Declarations in the member-function local scopes are considered first. 2、If the a declaration for the name is not found in the member function, the declarations for all the class members are considered. 3、If a declaration for the name is not found in the class, the declarations that appear in scope before the member function definition are considered.
// 启动wpa_supplicant时候的命令行参数保存在struct wpa_params结构的变量中 struct wpa_params { int daemonize; int wait_for_monitor; char *pid_file; int wpa_debug_level; int wpa_debug_show_keys; int wpa_debug_timestamp;
/* Global ctrl_iface path/parameter */
char *ctrl_interface;
/* Global ctrl_iface group */
char *ctrl_interface_group;
int dbus_ctrl_interface;
const char *wpa_debug_file_path;
int wpa_debug_syslog;
int wpa_debug_tracing;
/*** override_driver - Optional driver parameter override
** This parameter can be used to override the driver parameter in
* dynamic interface addition to force a specific driver wrapper to be
* used instead.
*/
char *override_driver;
/*** override_ctrl_interface - Optional ctrl_interface override
** This parameter can be used to override the ctrl_interface parameter
* in dynamic interface addition to force a control interface to be
* created.
*/
char *override_ctrl_interface;
char *entropy_file;
ifdef CONFIG_P2P
/*** conf_p2p_dev - Configuration file used to hold the
* P2P Device configuration parameters.
** This can also be %NULL. In such a case, if a P2P Device dedicated
* interfaces is created, the main configuration file will be used.
*/
char *conf_p2p_dev;
struct eloop_signal
{
    int sig;                      /* signal number */
    void *user_data;
    eloop_signal_handler handler; /* signal handler */
    int signaled;                 /* 进程是否收到该信号的标志 */
};
struct eloop_data中与信号事件有关的数据域如下:
struct eloop_data
{
    /* other fields */

    int signal_count;             /* 程序初始化过程中注册的信号处理函数的数量 */
    struct eloop_signal *signals; /* 程序初始化过程中注册的所有的信号处理函数 */
    int signaled;  /* 程序运行过程中是否有未处理的信号的标志 */
}
Creating a branch is very simple—you make a copy of the project in the repository using the svn copy command.
$ svn copy http://svn.example.com/repos/calc/trunk \ http://svn.example.com/repos/calc/branches/my-calc-branch \ -m"Creating a private branch of /calc/trunk." Committed revision 341.
Working with Your Branch
Now that you’ve created a branch of the project, you can check out a new working copy to start using it:
$ svn checkout http://svn.example.com/repos/calc/branches/my-calc-branch
A my-calc-branch/Makefile
A my-calc-branch/integer.c
A my-calc-branch/button.c
Checked out revision 341.
There’s nothing special about this working copy; it simply mirrors a different directory in the repository. Subversion has no internal concept of a branch—it knows only how to make copies. When you copy a directory, the resultant directory is only a “branch” because you attach that meaning to it. You may think of the directory differently, or treat it differently, but to Subversion it’s just an ordinary directory that happens to carry some extra historical information. Most teams follow a convention of putting all branches into a /branches directory, but you’re free to invent any policy you wish.
Changeset
A changeset is just a collection of changes with a unique name. The changes might include textual edits to file contents, modifications to tree structure, or tweaks to metadata. In more common speak, a changeset is just a patch with a name you can refer to. In Subversion, a global revision number N names a tree in the repository. It’s also the name of an implicit changeset: if you compare tree N with tree N-1, you can derive the exact patch that was committed. For this reason, it’s easy to think of revision N as not just a tree, but a changeset as well. And Subversion’s svn merge command is able to use revision numbers. You can merge specific changesets from one branch to another by naming them in the merge arguments: passing -c 9238 to svn merge would merge changeset r9238 into your working copy.
Merge
A better name for the merge command might have been svn diff-and-apply, because that’s all that happens: two repository trees are compared, and the differences are applied to a working copy. If you’re using svn merge to do basic copying of changes between branches, it will generally do the right thing automatically. For example, a command such as the following: $ svn merge http://svn.example.com/repos/calc/some-branch will attempt to duplicate any changes made on some-branch into your current working directory. The command is smart enough to only duplicate changes that your working copy doesn’t yet have. If you repeat this command once a week, it will only duplicate the “newest” branch changes that happened since you last merged.If you choose to use the svn merge command in all its full glory by giving it specific revision ranges to duplicate, the command takes three main arguments:
An initial repository tree (often called the left side of the comparison)
A final repository tree (often called the right side of the comparison)
A working copy to accept the differences as local changes (often called the target of the merge) Once these three arguments are specified, the two trees are compared, and the differences are applied to the target working copy as local modifications. When the command is done, the results are no different than if you had hand-edited the files or run various svn add or svn delete commands yourself. If you like the results, you can commit them. If you don’t like the results, you can simply svn revert all of the changes.
The first syntax lays out all three arguments explicitly, naming each tree in the form URL@REV and naming the working copy target. The second syntax can be used as a shorthand for situations when you’re comparing two different revisions of the same URL. The last syntax shows how the working copy argument is optional; if omitted, it defaults to the current directory. The last syntax shows only replicate just a single change.
Keeping a Branch in Sync
Let’s suppose that a week has passed since you started working on your private branch. Your new feature isn’t finished yet, but at the same time you know that other people on your team have continued to make important changes in the project’s /trunk. In fact, this is a best practice: frequently keeping your branch in sync with the main development line helps prevent “surprise” conflicts when it comes time for you to fold your changes back into the trunk. Subversion is aware of the history of your branch and knows when it divided away from the trunk. To replicate the latest, greatest trunk changes to your branch, first make sure your working copy of the branch is “clean”—that it has no local modifications reported by svn status. Then simply run:
$ svn merge http://svn.example.com/repos/calc/trunk
--- Merging r345 through r356 into '.':
U button.c
U integer.c
This basic syntax—svn merge URL—tells Subversion to merge all recent changes from the URL to the current working directory. After running the prior example, your branch working copy now contains new local modifications, and these edits are duplications of all of the changes that have happened on the trunk since you first created your branch:
$ svn status
M .
M button.c
M integer.c
At this point, the wise thing to do is look at the changes carefully with svn diff, and then build and test your branch. Notice that the current working directory (“.”) has also been modified; the svn diff will show that its svn:mergeinfo property has been either created or modified. This is important merge-related metadata that you should not touch, since it will be needed by future svn merge commands. After performing the merge, you might also need to resolve some conflicts (just as you do with svn update) or possibly make some small edits to get things working properly. (Remember, just because there are no syntactic conflicts doesn’t mean there aren’t any semantic conflicts!) If you encounter serious problems, you can always abort the local changes by running svn revert . -R (which will undo all local modifications) and start a long “what’s going on?” discussion with your collaborators. If things look good, however, you can submit these changes into the repository:
At this point, your private branch is now “in sync” with the trunk, so you can rest easier knowing that as you continue to work in isolation, you’re not drifting too far away from what everyone else is doing. Suppose that another week has passed. You’ve committed more changes to your branch, and your comrades have continued to improve the trunk as well. Once again, you’d like to replicate the latest trunk changes to your branch and bring yourself in sync. Just run the same merge command again!
$ svn merge http://svn.example.com/repos/calc/trunk
--- Merging r357 through r380 into '.':
U integer.c
U Makefile
A README
Subversion knows which trunk changes you’ve already replicated to your branch, so it carefully replicates only those changes you don’t yet have. What happens when you finally finish your work, though? The process is simple. First, bring your branch in sync with the trunk again, just as you’ve been doing all along:
$ svn merge http://svn.example.com/repos/calc/trunk
--- Merging r381 through r385 into '.':
U button.c
U README
$ # build, test, ...
$ svn commit -m "Final merge of trunk changes to my-calc-branch."
Sending .
Sending button.c
Sending README
Transmitting file data ..
Committed revision 390.
Now, you use svn merge to replicate your branch changes back into the trunk. You’ll need an up-to-date working copy of /trunk. However you get a trunk working copy, remember that it’s a best practice to do your merge into a working copy that has no local edits and has been recently updated (i.e., is not a mixture of local revisions).
$ svn update # (make sure the working copy is up todate) At revision 390. $ svn merge--reintegrate http://svn.example.com/repos/calc/branches/my-calc-branch --- Merging differences between repository URLs into '.': U button.c U integer.c U Makefile U . $ # build, test, verify, ... $ svn commit -m "Merge my-calc-branch back into trunk!" Sending . Sending button.c Sending integer.c Sending Makefile Transmitting file data .. Committed revision 391.
Notice our use of the —reintegrate option this time around. The option is critical for reintegrating changes from a branch back into its original line of development—don’t forget it! It’s needed because this sort of “merge back” is a different sort of work than what you’ve been doing up until now. Now that your private branch is merged to trunk, you may wish to remove it from the repository:
In Subversion 1.5, once a —reintegrate merge is done from branch to trunk, the branch is no longer usable for further work. It’s not able to correctly absorb new trunk changes, nor can it be properly reintegrated to trunk again. For this reason, if you want to keep working on your feature branch, we recommend destroying it and then recreating it from the trunk:
Mergeinfo
The basic mechanism Subversion uses to track changesets—that is, which changes have been merged to which branches—is by recording data in properties. Specifically, merge data is tracked in the svn:mergeinfo property attached to files and directories.
$ cd my-calc-branch $ svn propget svn:mergeinfo . /trunk:341-390
There’s also a subcommand, svn mergeinfo, which can be helpful in seeing not only which changesets a directory has absorbed, but also which changesets it’s still eligible to receive. This gives a sort of preview of the next set of changes that svn merge will replicate to your branch.
$ cd my-calc-branch # Which changes have already been merged from trunk to branch? $ svn mergeinfo http://svn.example.com/repos/calc/trunk r341 r342 … r389 r390 # Which changes are still eligible to merge from trunk to branch? $ svn mergeinfo http://svn.example.com/repos/calc/trunk --show-revs eligible r391 r392 r393 r394 r395
The svn mergeinfo command requires a “source” URL (where the changes would be coming from), and takes an optional “target” URL (where the changes would be merged to). If no target URL is given, it assumes that the current working directory is the target. In the prior example, because we’re querying our branch working copy, the command assumes we’re interested in receiving changes to /branches/mybranch from the specified trunk URL. Another way to get a more precise preview of a merge operation is to use the —dry-run option:
$ svn merge http://svn.example.com/repos/calc/trunk --dry-run U integer.c $ svn status # nothing printed, working copy is still unchanged.
Undoing Changes
An extremely common use for svn merge is to roll back a change that has already been committed. Suppose you’re working away happily on a working copy of /calc/trunk, and you discover that the change made way back in revision 303, which changed integer.c, is completely wrong. All you need to do is to specify a reverse difference. (You can do this by specifying —revision 303:302, or by an equivalent —change -303.)
Traversing Branches
The svn switch command transforms an existing working copy to reflect a different branch. “Switching” a working copy that has no local modifications to a different branch results in the working copy looking just as it would if you’d done a fresh checkout of the directory.
$ svn info | grep URL URL: http://svn.example.com/repos/calc/trunk $ svn switchhttp://svn.example.com/repos/calc/branches/my-calc-branch U integer.c U button.c U Makefile Updated to revision 341. $ svn info | grep URL URL: http://svn.example.com/repos/calc/branches/my-calc-branch
Tags
A tag is just a “snapshot” of a project in time. Once again, svn copy comes to the rescue. If you want to create a snapshot of /calc/trunk exactly as it looks in the HEAD revision, make a copy of it:
$ svn copy http://svn.example.com/repos/calc/trunk \ http://svn.example.com/repos/calc/tags/release-1.0 \ -m"Tagging the 1.0 release of the 'calc' project." Committed revision 902.
This example assumes that a /calc/tags directory already exists. (If it doesn’t, you can create it using svn mkdir.) After the copy completes, the new release-1.0 directory is forever a snapshot of how the /trunk directory looked in the HEAD revision at the time you made the copy. In Subversion, there’s no difference between a tag and a branch. Both are just ordinary directories that are created by copying. Just as with branches, the only reason a copied directory is a “tag” is because humans have decided to treat it that way: as long as nobody ever commits to the directory, it forever remains a snapshot. If people start committing to it, it becomes a branch.
Common Branching Patterns
1. Release Branches
Most software has a typical life cycle: code, test, release, repeat. There are two problems with this process. First, developers need to keep writing new features while quality assurance teams take time to test supposedly stable versions of the software. New work cannot halt while the software is tested. Second, the team almost always needs to support older, released versions of software; if a bug is discovered in the latest code, it most likely exists in released versions as well, and customers will want to get that bug fix without having to wait for a major new release. The typical procedure looks like this:
Developers commit all new work to the trunk. Day-to-day changes are committed to /trunk: new features, bug fixes, and so on.
The trunk is copied to a “release” branch. When the team thinks the software is ready for release (say, a 1.0 release), /trunk might be copied to /branches/1.0.
Teams continue to work in parallel. One team begins rigorous testing of the release branch, while another team continues new work (say, for version 2.0) on /trunk. If bugs are discovered in either location, fixes are ported back and forth as necessary. At some point, however, even that process stops. The branch is “frozen” for final testing right before a release.
The branch is tagged and released. When testing is complete, /branches/1.0 is copied to /tags/1.0.0 as a reference snapshot. The tag is packaged and released to customers.
The branch is maintained over time. While work continues on /trunk for version 2.0, bug fixes continue to be ported from /trunk to /branches/1.0. When enough bug fixes have accumulated, management may decide to do a 1.0.1 release: /branches/1.0 is copied to /tags/1.0.1, and the tag is packaged and released. This entire process repeats as the software matures: when the 2.0 work is complete, a new 2.0 release branch is created, tested, tagged, and eventually released. After some years, the repository ends up with a number of release branches in “maintenance” mode, and a number of tags representing final shipped versions.
2. Feature Branches
It’s a temporary branch created to work on a complex change without interfering with the stability of /trunk. Unlike release branches (which may need to be supported forever), feature branches are born, used for a while, merged back to the trunk, and then ultimately deleted. Here’s a great risk to working on a branch for weeks or months; trunk changes may continue to pour in, to the point where the two lines of development differ so greatly that it may become a nightmare trying to merge the branch back to the trunk. This situation is best avoided by regularly merging trunk changes to the branch. Make up a policy: once a week, merge the last week’s worth of trunk changes to the branch.
Revision numbers in Subversion are pretty straightforward—integers that keep getting larger as you commit more changes to your versioned data. Besides the integer revision numbers, svn allows as input some additional forms of revision specifiers: revision keywords and revision dates.
HEAD The latest (or “youngest”) revision in the repository.
BASE The revision number of an item in a working copy. If the item has been locally modified, this refers to the way the item appears without those local modifications.
COMMITTED The most recent revision prior to, or equal to, BASE, in which an item changed.
PREV The revision immediately before the last revision in which an item changed. Here are some examples of revision keywords in action:
$ svn diff -r PREV:COMMITTED foo.c # shows the last change committed to foo.c $ svn log -r HEAD # shows log message for the latest repository commit $ svn diff -r HEAD # compares your working copy (with all of its local changes) to the # latest version of that tree in the repository $ svn diff -r BASE:HEAD foo.c # compares the unmodified version of foo.c with the latest version of # foo.c in the repository $ svn log -r BASE:HEAD # shows all commit logs for the current versioned directory since you # last updated $ svn update -r PREV foo.c # rewinds the last change on foo.c, decreasing foo.c's working revision $ svn diff -r BASE:14 foo.c # compares the unmodified version of foo.c with the way foo.c looked # in revision 14
2. Ignoring Unversioned Items
In any given working copy, there is a good chance that alongside all those versioned files and directories are other files and directories that are neither versioned nor intended to be.
So Subversion provides two ways for telling it which files you would prefer that it simply disregard. One of the ways involves the use of Subversion’s runtime configuration system(see the section called “Runtime Configuration Area”), and therefore applies to all the Subversion operations that make use of that runtime configuration—generally those performed on a particular computer or by a particular user of a computer. The other way makes use of Subversion’s directory property support and is more tightly bound to the versioned tree itself, and therefore affects everyone who has a working copy of that tree. Both of the mechanisms use file patterns (strings of literal and special wildcard characters used to match against filenames) to decide which files to ignore.
The Subversion runtime configuration system provides an option, global-ignores, whose value is a whitespace-delimited collection of file patterns.When found on a versioned directory, the svn:ignore property is expected to contain a list of newline-delimited file patterns that Subversion should use to determine ignorable objects in that same directory. These patterns do not override those found in the global-ignores runtime configuration option, but are instead appended to that list. And it’s worth noting again that, unlike the global-ignores option, the patterns found in the svn:ignore property apply only to the directory on which that property is set, and not to any of its subdirectories.
Say you have the following output from svn status:
$ svn status calc M calc/button.c ? calc/calculator ? calc/data.c ? calc/debug_log ? calc/debug_log.1 ? calc/debug_log.2.gz ? calc/debug_log.3.gz
In this example, you have made some property modifications to button.c, but in your working copy, you also have some unversioned files. And you know that you aren’t interested in seeing those log files every time you run svn status. So you use svn propedit svn:ignore calc to add some ignore patterns to the calc directory. For example, you might add this as the new value of the svn:ignore property:
calculator debug_log*
After you’ve added this property, you will now have a local property modification on the calc directory. But notice what else is different about your svn status output:
$ svn status M calc M calc/button.c ? calc/data.c
3. Sparse Directories
By default, most Subversion operations on directories act in a recursive manner. Subversion introduces a feature called sparse dir- ectories (or shallow checkouts) that allows you to easily check out a working copy—or a portion of a working copy—more shallowly than full recursion, with the freedom to bring in previously ignored files and subdirectories at a later time. Here are the depth values that you can request for a given Subversion operation:
—depth empty Include only the immediate target of the operation, not any of its file or directory children.
—depth files Include the immediate target of the operation and any of its immediate file children.
—depth immediates Include the immediate target of the operation and any of its immediate file or directory children. The directory children will themselves be empty.
—depth infinity Include the immediate target, its file and directory children, its children’s children, and so on to full recursion.
4. Properties
In addition to versioning your directories and files, Subversion provides interfaces for adding, modifying, and removing versioned metadata on each of your versioned directories and files. We refer to this metadata as properties, and they can be thought of as two-column tables that map property names to arbitrary values attached to each item in your working copy. And the best part about these properties is that they, too, are versioned, just like the textual contents of your files. Subversion has reserved the set of properties whose names begin with svn: as its own. You should avoid creating custom properties for your own needs whose names begin with this prefix.
Just as files and directories may have arbitrary property names and values attached to them, each revision as a whole may have arbitrary properties attached to it.The main difference is that revision properties are not versioned.
svn propset
$ svn propset copyright '(c) 2006 Red-Bean Software' calc/button.c property 'copyright' set on 'calc/button.c'
$ svn propset license -F /path/to/LICENSE calc/button.c property 'license' set on 'calc/button.c'
In addition to the propset command, the svn program supplies the propedit command. This command uses the configured editor program to add or modify properties.
The svn proplist command will list the names of properties that exist on a path. Once you know the names of the prop- erties on the node, you can request their values individually using svn propget.
$ svn propdel license calc/button.c property 'license' deleted from 'calc/button.c'.
Remember those unversioned revision properties? You can modify those, too, using the same svn subcommands that we just described. Simply add the —revprop command-line parameter and specify the revision whose property you wish to modify. Since revisions are global, you don’t need to specify a target path to these property-related commands so long as you are positioned in a working copy of the repository whose revision property you wish to modify. Otherwise, you can simply provide the URL of any path in the repository of interest (including the repository’s root URL). For example, you might want to replace the commit log message of an existing revision. If your current working directory is part of a working copy of your repository, you can simply run the svn propset command with no target path:
But even if you haven’t checked out a working copy from that repository, you can still effect the property change by providing the repository’s root URL:
To get an overview of your changes before committing, you’ll use the svn status command. Here are a few examples of the most common status codes that svn status can return. (Note that the text following # is not actually printed by svn status.)
? scratch.c # file is not under version control A stuff/loot/bloo.h # file is scheduled for addition C stuff/loot/lump.c # file has textual conflicts from anupdate D stuff/fish.c # file is scheduled for deletion M bar.c # the content in bar.c has local modifications
Command svn status does not contact the repository. Instead, they compare the metadata in the .svn directory with the working copy. There is the —show-updates (-u) option, which contacts the repository and adds information about things that are out of date:
$ svn status -u -v M * 44 23 sally README M 44 20 harry bar.c * 44 35 harry stuff/trout.c D 44 19 ira stuff/fish.c A 0 ? ? stuff/things/bloo.h Status against revision: 46
svn status also has a —verbose (-v) option, which will show you the status of every item in your working copy, even if it has not been changed. Notice the two asterisks: if you were to run svn update at this point, you would receive changes to README and trout.c. This tells you some very useful information—you’ll need to update and get the server changes on README before you commit, or the repository will reject your commit for being out of date.
svn revert
Suppose while viewing the output of svn diff you determine that all the changes you made to a particular file are mistakes. Maybe you shouldn’t have changed the file at all, or perhaps it would be easier to make different changes starting from scratch.Subversion reverts the file to its premodified state by overwriting it with the cached “pristine” copy from the .svn area. But also note that svn revert can undo any scheduled operations
$ svn status README $ svn delete README D README $ svn revert README Reverted 'README' $ svn status README
Resolve Conflicts (Merging Others’ Changes)
We’ve already seen how svn status -u can predict conflicts. Suppose you run svn update and some interesting things occur:
$ svn update U INSTALL G README Conflict discovered in 'bar.c'. Select: (p) postpone, (df) diff-full, (e) edit, (h) helpformore options:
The U and G codes are no cause for concern; those files cleanly absorbed changes from the repository. The files marked with U contained no local changes but were Updated with changes from the repository. The G stands for merGed, which means that the file had local changes to begin with, but the changes coming from the repository didn’t overlap with the local changes. But the next two lines are part of a feature called interactive conflict resolution. This means that the changes from the server overlapped with your own, and you have the opportunity to resolve this conflict. The most commonly used options are displayed, but you can see all of the options by typing h:
(p) postpone - mark the conflict tobe resolved later (df) diff-full - show allchanges made to merged file (e) edit - change merged file in an editor (r) resolved - accept merged version of file (mf) mine-full - accept my version of entire file (ignore their changes) (tf) theirs-full - accept their version of entire file (lose my changes) (l) launch - launch external tool toresolve conflict (h) help - show this list
Let’s briefly review each of these options before we go into detail on what each option means.
(p)ostpone Leave thefilein a conflicted state for you to resolve after your update is complete. (d)iff Display the differences betweenthe base revision andthe conflicted file itself in unified diff format. (e)dit Open thefilein conflict with your favorite editor, assetinthe environment variable EDITOR. (r)esolved After editing a file, tell svn that you've resolved the conflicts inthefileandthat it should accept the current contents—basically that you've “resolved” the conflict. (m)ine-(f)ull Discard the newly received changes fromthe server and use only your local changes for thefile under review. (t)heirs-(f)ull Discard your local changes tothefile under review and use only the newly received changes fromthe server. (l)aunch Launch an external program to perform the conflict resolution. This requires a bit of preparation beforehand. (h)elp Show thelistof all possible commands you can use in interactive conflict resolution.
Before deciding how to attack a conflict interactively, odds are that you’d like to see exactly what is in conflict, and the diff command (d) is what you’ll use for this:
Select: (p) postpone, (df) diff-full, (e) edit, (h)elp for more options : d --- .svn/text-base/sandwich.txt.svn-base Tue Dec 11 21:33:57 2007 +++ .svn/tmp/tempfile.32.tmp Tue Dec 11 21:34:33 2007 @@ -1 +1,5 @@ -Just buy a sandwich. +<<<<<<< .mine +Go pick up a cheesesteak. +======= +Bring me a taco! +>>>>>>> .r32
The first line of the diff content shows the previous contents of the working copy (the BASE revision), the next content line is your change, and the last content line is the change that was just received from the server (usually the HEAD revision).
When you postpone a conflict resolution, svn typically does three things to assist you in noticing and resolving that conflict:
Subversion prints a C during the update and remembers that the file is in a state of conflict.
If Subversion considers the file to be mergeable, it places conflict markers—special strings of text that delimit the “sides” of the conflict—into the file to visibly demonstrate the overlapping areas. (Subversion uses the svn:mime-type property to decide whether a file is capable of contextual, line-based merging)
For every conflicted file, Subversion places three extra unversioned files in your working copy:
filename.mine This is your file as it existed in your working copy before you updated your working copy—that is, without conflict markers. This file has only your latest changes in it.
filename.rOLDREV This is the file that was the BASE revision before you updated your working copy. That is, the file that you checked out before you made your latest edits.
filename.rNEWREV This is the file that your Subversion client just received from the server when you updated your working copy. This file corresponds to the HEAD revision of the repository.
If you’ve postponed a conflict, you need to resolve the conflict before Subversion will allow you to commit your changes. You’ll do this with the svn resolve command and one of several arguments to the —accept option.
If you want to choose the version of the file that you last checked out before making your edits, choose the base argument.
If you want to choose the version that contains only your edits, choose the mine-full argument.
If you want to choose the version that your most recent update pulled from the server, choose the theirs-full argument.
However, if you want to pick and choose from your changes and the changes that your update fetched from the server, merge the conflicted text “by hand” (by examining and editing the conflict markers within the file) and then choose the working argument.
svn resolve removes the three temporary files and accepts the version of the file that you specified with the —accept option, and Subversion no longer considers the file to be in a state of conflict:
$ svn resolve --accept working sandwich.txt Resolved conflicted state of 'sandwich.txt'
svn help subcommand will describe the syntax, options, and behavior of the subcommand.
2. import
The svn import command is a quick way to copy an unversioned tree of files into a repository, creating intermediate directories as necessary. You typically use this when you have an existing tree of files that you want to begin tracking in your Subversion repository. 例如,假设svn服务器上存在以下目录https://var/svn/newrepos/,本地机器上存在md5目录,并且md5目录下存在md5.c和md5.h两个文件。现在想把md5这个新的项目导入到svn服务器,使其具有版本管理功能。
Note that after the import is finished, the original tree is not converted into a working copy. To start working, you still need to svn checkout a fresh working copy of the tree.
3. checkout
Most of the time, you will start using a Subversion repository by doing a checkout of your project. Checking out a repository creates a “working copy” of it on your local machine.
svn checkout https://var/svn/newrepos/md5 svn co https://var/svn/newrepos/md5
While you can certainly check out a working copy with the URL of the repository as the only argument, you can also specify a directory after your repository URL. This places your working copy in the new directory that you name.
svn co https://var/svn/newrepos/md5 my_md5
That will place your working copy in a directory named my_md5 instead of a directory named md5 as we did previously. The directory my_md5 will be created if it doesn’t already exist.
4. Authenticating As a Different User
If you’re working in a shared working copy such as a system configuration directory or a web server document root. In this case, just pass the —username option on the command line, and Subversion will attempt to authenticate as that user, prompting you for a password if necessary.
svn list https://var/svn/newrepos/md5 --username xiaoming
5. svn export
If you’re building a release and wish to bundle up your files from Subversion but don’t want those pesky .svn directories in the way, you can use svn export to create a local copy of all or part of your repository sans .svn directories.
Several commands can provide you with historical data from the repository:
svn log
Shows you broad information: log messages with date and author information attached to revisions and which paths changed in each revision. If you wish to see a different range of revisions in a particular order or just a single revision, pass the —revision (-r) option:
$ svn log -r 5:19 # shows logs 5 through 19 in chronological order $ svn log -r 19:5 # shows logs 5 through 19 in reverse order $ svn log -r 8 # shows logfor revision 8
In verbose mode, svn log will include a list of changed paths in a revision in its output:
$ svn log -r 8 -v ------------------------------------------------------------------------ r8 | sally | 2008-05-21 13:19:25 -0500 (Wed, 21 May 2008) | 1 line Changed paths: M /trunk/code/foo.c M /trunk/code/bar.h A /trunk/code/doc/README Frozzled the sub-space winch.
svn diff
There are three distinct uses of svn diff:
Invoking svn diff with no options will compare your working files to the cached “pristine” copies in the .svn area
If a single —revision (-r) number is passed, your working copy is compared to the specified revision in the repository
If two revision numbers, separated by a colon, are passed via —revision (-r), the two revisions are directly compared: svn diff -r 2:3 rules.txt
If a “—change(-c) ARG” is passed, it shows the change made by revision ARG(like -r ARG-1:ARG). If ARG is negative this is like -r ARG:ARG-1
svn cat
Retrieves a file as it existed in a particular revision number and displays it on your screen
svn list
Displays the files in a directory for any given revision
One of the operands for ADD operation may be in memory, while the other is in a register. Examples are IBM 360 and Intel x86.
2. register plus memory architecture
Both operands for ADD operation may be in memory or in registers, or in combinations.
3. load/store architecture
Both operands for ADD operation must be in registers. In computer engineering a load/store architecture only allows memory to be accessed by load and store operations, and all values for an operation need to be loaded from memory and be present in registers. Following the operation, the result needs to be stored back to memory. For instance, in a load/store approach both operands for an ADD operation must be in registers. This differs from a register memory architecture in which one of the operands for the ADD operation may be in memory, while the other is in a register. RISC systems such as PowerPC, SPARC, ARM or MIPS use the load/store architecture.
/* * Double linked lists with a single pointer list head. * Mostly useful for hash tables where the two pointer list head is * too wasteful. * You lose the ability to access the tail in O(1). */
这里巧妙的利用了0地址。也许有人会产生疑问,怎么可能会对0地址进行操作呢?为了更容易理解,下面都使用struct person为例。其实,0是一个具体的常量值,它是一个地址,而(struct person *)0则是一个指针,而且是一个指针常量(即指针本身是常量,但它指向的地址里的内容可以改变)。只要我们不去对一个空指针进行读写,就不会存在非法访问内存的问题,例如:
// 读取操作 struct person *xiao_hua = 0; struct person tmp = *xiao_hua; // error
// 写入操作 struct person *xiao_hua = 0; struct person tmp = {180, 60}; *xiaohua = tmp; // error
那么,其他的操作都是OK的。
offsetof(struct person, weight) 经过宏替换后变为 ((size_t) &((struct person )0)->weight) 1、(struct person )0 表示 一个指向struct person结构的指针,虽然这个struct person结构不存在,但只要不去对它进行读写就OK 2、(struct person )0)->weight 表示 1中的指针所指向的那个struct person结构的weight成员 3、&((struct person )0)->weight 表示 1中的指针所指向的那个struct person结构的weight成员的地址 4、weight成员的地址 减去 它所在的struct person结构的地址,就可以得出weight在struct person结构中的偏移量,但是此时,struct person结构的地址为0,所以weight成员的地址就是weight在struct person结构中的偏移量
ssh-keygen -t rsa -C "your_email@example.com" # Creates a new ssh key, using the provided email as a label Generating public/private rsa key pair.
让密钥文件保存在默认位置,直接按回车键即可。
Enter file inwhich to save the key (/Users/you/.ssh/id_rsa): [Press enter]
输入一个使用密钥文件时需要输入的密码(不然每个人都可以随便使用此密钥文件来访问你的github)
Enter passphrase (empty for no passphrase): [Type a passphrase] Enter same passphrase again: [Type passphrase again]
输入密码之后,界面会输出成功生成密钥的信息
Your identification has been saved in /Users/you/.ssh/id_rsa. Your public key has been saved in /Users/you/.ssh/id_rsa.pub. The key fingerprint is: 01:0f:f4:3b:ca:85:d6:17:a1:7d:f0:68:9d:f0:a2:db your_email@example.com
1.3 把公钥添加到自己的github账号
打开公钥文件/Users/you/.ssh/id_rsa.pub,复制一下里面的全部内容。需要注意的一点是,复制公钥的时候不能多了换行符或者空格,否则添加公钥时会失败。然后,参见github的添加ssh密钥的官方文档的“Step 4: Add your SSH key to your account”章节,将自己的公钥添加到github账号。
1.4 测试是否能ssh连接到github
打开git bash,输入
ssh -T git@github.com # Attempts to ssh to GitHub
你会看到以下信息
The authenticity of host 'github.com (207.97.227.239)' can't be established. RSA key fingerprint is 16:27:ac:a5:76:28:2d:36:63:1b:56:4d:eb:df:a6:48. Are you sure you want to continue connecting (yes/no)?
输入yes,看到以下信息说明ssh配置成功
Hi username! You've successfully authenticated, but GitHub does not provide shell access.
# Note: ~/.ssh/environment should not be used, as it # already has a different purpose in SSH.
env=~/.ssh/agent.env
# Note: Don't bother checking SSH_AGENT_PID. It's not used # by SSH itself, and it might even be incorrect # (for example, when using agent-forwarding over SSH).
agent_is_running() { if [ "$SSH_AUTH_SOCK" ]; then # ssh-add returns: # 0 = agent running, has keys # 1 = agent running, no keys # 2 = agent not running ssh-add -l >/dev/null 2>&1 || [ $? -eq1 ] else false fi }
# if your keys are not stored in ~/.ssh/id_rsa or ~/.ssh/id_dsa, you'll need # to paste the proper path after ssh-add if ! agent_is_running; then agent_start ssh-add elif ! agent_has_keys; then ssh-add fi
Welcome to Hexo! This is your very first post. Check documentation for more info. If you get any problems when using Hexo, you can find the answer in troubleshooting or you can ask me on GitHub.
ctags可以使我们在函数调用和函数定义之间来回跳转,方便阅读源代。The ability to jump from the current source file to definitions of functions and structures in other files. A tag is an identifier that appears in a “tags” file. It is a sort of label that can be jumped to. For example: In C programs each function name can be used as a tag. The “tags” file has to be generated by a program like ctags, before the tag commands can be used.